GMS:MF6 OC Package: Difference between revisions
From XMS Wiki
Jump to navigationJump to search
No edit summary |
|||
| (9 intermediate revisions by 3 users not shown) | |||
| Line 1: | Line 1: | ||
{{MODFLOW 6 Beta}} | |||
{{ | {{MODFLOW 6 Links}} | ||
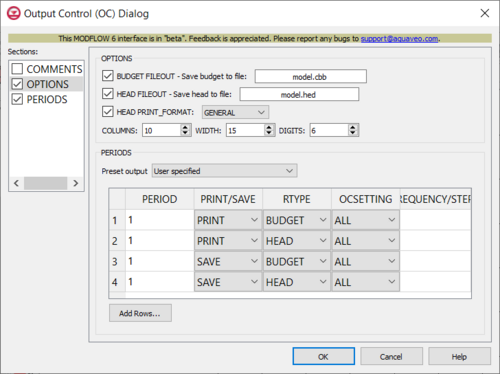
[[File:MF6-OutputControl | [[File:MF6-OutputControl dialog_v2.png|thumb|500px|right|The ''Output Control (OC) Dialog'']] | ||
The ''Output Control (OC) Package'' dialog is accessed by double-clicking on the OC package under a MODFLOW 6 simulation in the Project Explorer. It contains the following sections and options: | The ''Output Control (OC) Package'' dialog is accessed by double-clicking on the OC package under a MODFLOW 6 simulation in the Project Explorer. It contains the following sections and options: | ||
*''Sections'' list – A list of sections that can be turned on or off: | *''Sections'' list – A list of sections that can be turned on or off: | ||
| Line 9: | Line 9: | ||
*''Comments'' section – Enter general alphanumeric comments. Comments entered here get written at the top of the file, preceded by a '#' symbol. | *''Comments'' section – Enter general alphanumeric comments. Comments entered here get written at the top of the file, preceded by a '#' symbol. | ||
*''Options'' section contains the following: | *''Options'' section contains the following: | ||
**'' | **''BUDGET_FILEOUT:'' – Allows the specification of a file to which desired flow terms will be written. | ||
**'' | **''HEAD_FILEOUT:'' – Output file to write head information. | ||
**'' | **''HEAD_PRINT_FORMAT:'' – When turned on, allows you to specify the format to print to the listing file. Options include: | ||
***"GENERAL" – Prints in the general format to the listing file | ***"GENERAL" – Prints in the general format to the listing file | ||
***"EXPONENTIAL" – Prints in exponential format to the listing file. | ***"EXPONENTIAL" – Prints in exponential format to the listing file. | ||
***"FIXED" – Prints in a fixed format to the listing file. | ***"FIXED" – Prints in a fixed format to the listing file. | ||
***"SCIENTIFIC" – Prints in a scientific format to the listing file. | ***"SCIENTIFIC" – Prints in a scientific format to the listing file. | ||
**''COLUMNS'' – The number of columns for writing data. | |||
**''WIDTH'' – The width used to write each number | |||
**''DIGITS'' – The number of digits used for writing each number. | |||
*''Periods'' section – Contains the following: | *''Periods'' section – Contains the following: | ||
**'''Add Rows''' | **'''Add Rows''' – Click to bring up the ''Rows to Add'' dialog where the number of rows to add to the bottom can be specified. | ||
**''Preset output'' – Allows choosing which time periods you wish to output information. Options include: | **''Preset output'' – Allows choosing which time periods you wish to output information. Options include: | ||
***"At every time step" – Output information at every time step. | ***"At every time step" – Output information at every time step. | ||
***"At last time step of each stress period" – Output information at the last time step of each stress period. | ***"At last time step of each stress period" – Output information at the last time step of each stress period. | ||
***"User specified" – Allows user to choose the output settings manually which are entered into a given table. | ***"User specified" – Allows user to choose the output settings manually which are entered into a given table. | ||
** | **Table – Contains the following options: | ||
***''PERIOD'' – Indicates for which PERIOD the information will be saved. | ***''PERIOD'' – Indicates for which PERIOD the information will be saved. | ||
***''PRINT/SAVE'' – Indicates which stress period the information will be printed or saved on. | ***''PRINT/SAVE'' – Indicates which stress period the information will be printed or saved on. | ||
| Line 39: | Line 39: | ||
{{Navbox GMS}} | {{Navbox GMS}} | ||
[[Category:MODFLOW 6|OC]] | [[Category:MODFLOW 6|OC]] | ||
[[Category:MODFLOW 6 Dialogs|oc]] | |||
