|
|
| Line 35: |
Line 35: |
| *** '''Define Period''' – This button will allow a period to be defined. This will be active when no period has yet been defined, and it may gray out once one has been created. | | *** '''Define Period''' – This button will allow a period to be defined. This will be active when no period has yet been defined, and it may gray out once one has been created. |
| *** '''Delete Period''' – This button will delete the selected period. A dialog warning will come up first asking the user to confirm their decision to delete the period. | | *** '''Delete Period''' – This button will delete the selected period. A dialog warning will come up first asking the user to confirm their decision to delete the period. |
| *** '''Add Rows''' – This button will bring up an ''Add Stresses'' dialog. The following options can be used to help in adding the stresses: | | *** '''Add Rows''' – This button will bring up an [[#Add_Stresses_Dialog|''Add Stresses'']] dialog. <!--The following options can be used to help in adding the stresses: |
| **** Columns and Values – Numeric updowns, drop-downs, and textboxes can be used to enter the values for their relevant columns for all the new stresses. These may include columns that are not actually present in the spreadsheet. | | **** Columns and Values – Numeric updowns, drop-downs, and textboxes can be used to enter the values for their relevant columns for all the new stresses. These may include columns that are not actually present in the spreadsheet. |
| **** ''Number of rows to add'' – A numeric updown can be used to enter the number of rows that will be added to the spreadsheet. | | **** ''Number of rows to add'' – A numeric updown can be used to enter the number of rows that will be added to the spreadsheet. |
| **** ''Add to'' – There are two different options, only one of which can be selected at a time. | | **** ''Add to'' – There are two different options, only one of which can be selected at a time. |
| ***** ''All defined periods'' – These stresses will be added to all the periods that have been defined. | | ***** ''All defined periods'' – These stresses will be added to all the periods that have been defined. |
| ***** ''Only this period'' – These stresses will be added only to the currently selected period. | | ***** ''Only this period'' – These stresses will be added only to the currently selected period.--> |
| *** '''Delete Rows''' – This button will delete all of the stresses. A dialog warning will come up first asking the user to confirm their decision to delete the stresses. The dialog will also give them the option to either '''Delete From All Periods''' or '''Delete From Just This Period'''. | | *** '''Delete Rows''' – This button will delete all of the stresses. A dialog warning will come up first asking the user to confirm their decision to delete the stresses. The dialog will also give them the option to either '''Delete From All Periods''' or '''Delete From Just This Period'''. |
| *** '''Plot All Periods''' – This will allow the user to plot all the periods that have been defined. | | *** '''Plot All Periods''' – This will allow the user to plot all the periods that have been defined. |
| MODFLOW 6 |
|---|
| Models & Tools |
|---|
GWF Model
GWT Model
Cell Properties Dialog
Zone File |
| Packages |
|---|
| Flow: |
GNC, HFB, NPF |
|---|
| GWF: |
BUY, CHD, CSUB,
DRN, EVT, GHB,
LAK, MAW, MVR,
OBS, RCH,RIV,
SFR, STO, UZF,
WEL |
|---|
| GWT: |
ADV, CNC, DSP
FMI, IC, IST, LKT,
MDT, MST, MVT,
MWT, OBS, SFT,
SRC,SSM, UZT |
|---|
| Other |
DIS, DISU, DISV,
IMS, OC, TDIS,
PEST |
|---|
|
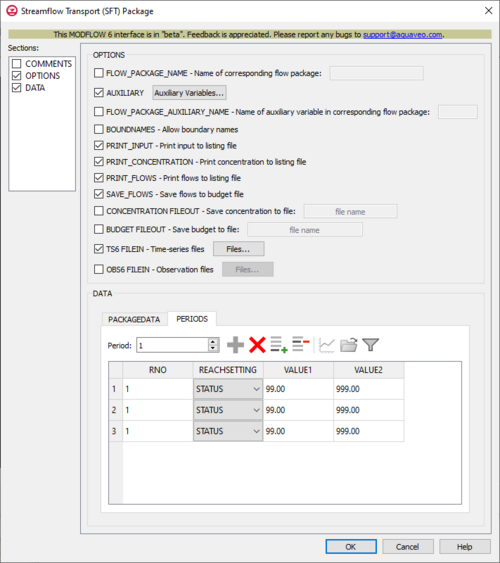
The
Streamflow Transport (SFT) Package dialog
The Streamflow Transport (SFT) Package dialog is accessed by double-clicking on the SFT package under a MODFLOW 6 simulation in the Project Explorer. It contains the following sections and options:
- Sections list – A list of sections that can be turned on or off:
- COMMENTS – Turn on to make the COMMENTS section visible.
- OPTIONS – Turn on to make the OPTIONS section visible.
- DATA – Turn on to make the DATA section visible.
- COMMENTS section – Enter general alphanumeric comments. Comments entered here get written at the top of the file, preceded by a '#' symbol.
- OPTIONS section – Options and settings:
- FLOW_PACKAGE_NAME – This allows the name of the corresponding flow package to be specified. Turning this on will activate a textbox to the right where this can be entered. If this isn't specified, then the corresponding flow package will need to have the same name as this advanced transport package (the name associated with this package in the GWT name file).
- AUXILIARY – This allows an array of one or more auxiliary variables to be named. There are no limits to the number of auxiliary variables that can be provided, but subsequent blocks will require data for each of the auxiliary variables that are defined. Turning this on will activate an Auxiliary Variables... button. Clicking the button will bring up an Auxiliary Variables dialog.
- FLOW_PACKAGE_AUXILIARY_NAME – This allows the name of an auxiliary variable in the corresponding flow package to be specified. Turning this on will activate a textbox to the right where this can be entered. If this is specified, then this advanced transport package's simulated concentrations will be copied into the auxiliary variable specified with the entered name. If the flow package does not have an auxiliary variable with this name, the program will terminate with an error. This option will have no effect if the flows for this advanced transport package are read from a file.
- BOUNDNAMES – This indicates that boundary names are allowed to be provided with the list of reach cells. This will add the BOUNDNAME column to the spreadsheet in the PACKAGEDATA tab of the DATA section.
- PRINT_INPUT – This indicates that the list of reach information input will be printed to the listing file immediately after it is read.
- PRINT_CONCENTRATION – This indicates that the list of reach stages concentration will be printed to the listing file, for every stress period where “HEAD PRINT” has been specified in Output Control. If PRINT_STAGE has been specified but there is no Output Control option, then they will be printed for the last time step of each stress period.
- PRINT_FLOWS – This indicates that the list of reach flow rates will be printed to the listing file, for every stress period time step where “BUDGET PRINT” has been specified in Output Control. If PRINT_FLOWS has been specified but there is no Output Control option, then they will be printed for the last time step of each stress period.
- SAVE_FLOWS – This indicates that reach flow terms will be saved to a budget file (specified in Output Control with "BUDGET FILEOUT").
- CONCENTRATION FILEOUT – This allows concentration information to be saved to a specifically defined binary output file.
- BUDGET FILEOUT – This allows budget information to be saved to a specifically defined binary output file.
- TS6 FILEIN – This allows time series files to be used as input to assign time-varying values. Specifying this option will allow a Files... button to its right to be clicked. Doing so will bring up a Files dialog. In this dialog, a spreadsheet can be filled in that has two columns.
- OBS6 FILEIN – This allows observations files to be used as input to define observations for the SFT package. Specifying this option will allow a Files... button to its right to be clicked. Doing so will bring up a Files dialog.
- DATA section – This deals with the DATA block.
- PACKAGEDATA – This deals with the PACKAGEDATA block.
- Set Up From SFR6 Package – This button allows for PACKAGEDATA to be set up from an already existing SFR6 Package. If one cannot be found, a warning dialog will come up saying so.
- Add Rows... – This button brings up a Rows to Add dialog, where a number can be specified to the right of Number of rows to add at bottom. This will help populate the spreadsheet.
- RNO – This column represents the RNO integer values, which define the reach numbers associated with the PACKAGEDATA data. These values must be greater than zero and less than or equal to the separately defined NREACHES value. If reach information has not been specified for every reach or information for a reach has been specified more than once, the program will terminate with an error.
- STRT – This column represents the STRT real values, which define the starting concentration for the reaches.
- AUX – These columns represent the values of the auxiliary variables for each reach, which previously may have been created if the AUXILIARY option was set. There will need to be values for the auxiliary variables for each reach. If time series files are used as input, entering a time series name instead of a numeric value can allow for values to be obtained from a time series.
- BOUNDNAME – This column represents the names of the reach cells, and will appear if the BOUNDNAMES option was set. BOUNDNAME values are ASCII character variables that can contain as many as 40 characters. If a BOUNDNAME value contains spaces within it, then the entire name will have to be enclosed within single quotes.
- PERIODS – This deals with the PERIODS block.
- Period – A numeric updown can be used to enter which period is being examined in the spreadsheet.
- Define Period – This button will allow a period to be defined. This will be active when no period has yet been defined, and it may gray out once one has been created.
- Delete Period – This button will delete the selected period. A dialog warning will come up first asking the user to confirm their decision to delete the period.
- Add Rows – This button will bring up an Add Stresses dialog.
- Delete Rows – This button will delete all of the stresses. A dialog warning will come up first asking the user to confirm their decision to delete the stresses. The dialog will also give them the option to either Delete From All Periods or Delete From Just This Period.
- Plot All Periods – This will allow the user to plot all the periods that have been defined.
- Open Time Series – This will allow the user to open a time series file.
- Filter on Selected Cells – ???
- RNO – This column represents the RNO integer values, which define the reach numbers associated with the PERIOD data. These values must be greater than zero and less than or equal to the separately defined NREACHES value.
- REACHSETTING – This column represents the REACHSETTING keywords, which can be used to start REACHSETTING strings (lines of information parsed into a keyword and values). These are used to assign the concentration associated with the corresponding flow terms. Concentrations cannot be specified for all flow terms (ex. The Streamflow Package supports a "DIVERSION" flow term. If this is active, diversion water will be routed using the calculated concentration of the reach.). These keywords are assigned in a drop-down, which can be selected to one of the following options:
- "STATUS" – This keyword option is used to define reach status. The STATUS options are:
- "ACTIVE" – The default value is "ACTIVE", which means the concentration will be calculated for the reach.
- "INACTIVE" – If the value has been set to "INACTIVE", then there will be no solute mass fluxes into/out of the reach and the inactive value will be written for the reach concentration.
- "CONSTANT" – If the value has been set to "CONSTANT", then the concentration for the reach will be fixed at the user-specified value.
- "CONCENTRATION" – This keyword option uses a real/character value to define the concentration for the reach. The specified value will only be applied for constant concentration reaches. If time series files are used as input, entering a time series name instead of a numeric value can allow for values to be obtained from a time series.
- "RAINFALL" – This keyword option uses a real/character value to define the rainfall solute concentration (ML-3) for the reach. If time series files are used as input, entering a time series name instead of a numeric value can allow for values to be obtained from a time series.
- "EVAPORATION" – This keyword option uses a real/character value to define the concentration of evaporated water (ML-3) for the reach. When this value is larger than the simulated concentration in the reach, then evaporated water will be removed at the same concentration as the reach. If time series files are used as input, entering a time series name instead of a numeric value can allow for values to be obtained from a time series.
- "RUNOFF" – This keyword option uses a real/character value to define the concentration of runoff (ML-3) for the reach. This value will need to be greater than or equal to zero. If time series files are used as input, entering a time series name instead of a numeric value can allow for values to be obtained from a time series.
- "AUXILIARY" – This keyword option is used to specify auxiliary variables, and will require two values to be properly used. The first value will be for the AUXNAME, the name for the auxiliary variable that will be assigned an AUXVAL. This AUXNAME will need to match one of the names that was previously defined for the auxiliary variables in the OPTIONS section. If it does not, the entered data will be ignored. The second value will be for the AUXVAL, the value for the auxiliary variable that was named. If time series files are used as input, entering a time series name instead of a numeric value can allow for values to be obtained from a time series.
- VALUE1 – This column is for the first value following the keyword specified in the REACHSETTING column. For most keywords, only this column will be needed.
- VALUE2 – This column is for the second value following the keyword specified in the REACHSETTING column. Only "AUXILIARY" requires this, as the first value will be an AUXNAME and the second value will be an AUXVAL.
Auxiliary Variables Dialog
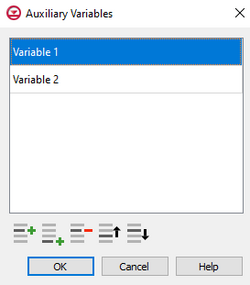
The
Auxiliary Variables dialog
The Auxiliary Variables dialog is accessed by clicking Auxiliary Variables... in the Options section of many package dialogs. It is used to define an array of one or more auxiliary variable names. It contains the following sections and buttons:
- At the top is an unlabeled section listing all of the variables, one per line. Double-click on a variable name to rename it.
- Insert Row
 – Click to insert a row above the currently-selected row.
- Add Row
 – Click to add a row below the currently-selected row.
- Delete Row
 – Click to delete the selected row.
- Move Up
 – Move the selected row up.
- Move Down
 – Move the selected row down.
Note that each variable name must be unique. If two or more variables share a name, variables added since opening the dialog will not be saved.
Time Series Files Dialog
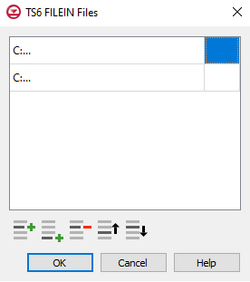
The
Time Series Files dialog
The Time Series Files dialog is accessed by clicking Time Series Files... in the Options section of many of the package dialogs. It is used to define an array of one or more time series files. It contains the following sections and buttons:
- At the top is an unlabeled section listing all of the time series files, one per line.
- Double-click on the first field to see the full file path and name.
- Click Edit... to open the time series file.
- Insert Row
 – Click to insert a row above the currently-selected row.
- Add Row
 – Click to add a row below the currently-selected row.
- Delete Row
 – Click to delete the selected row.
- Move Up
 – Move the selected row up.
- Move Down
 – Move the selected row down.
Observation Files Dialog
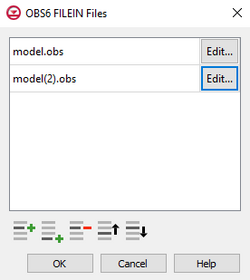
The
Observation Files dialog
The Observation Files dialog is accessed by clicking Observations... in the Options section of many of the package dialogs. It is used to define an array of one or more observation files. It contains the following sections and buttons:
- At the top is an unlabeled section listing all of the observation files, one per line.
- Insert Row
 – Click to insert a row above the currently-selected row.
- Add Row
 – Click to add a row below the currently-selected row.
- Delete Row
 – Click to delete the selected row.
- Move Up
 – Move the selected row up.
- Move Down
 – Move the selected row down.
Add Stresses Dialog
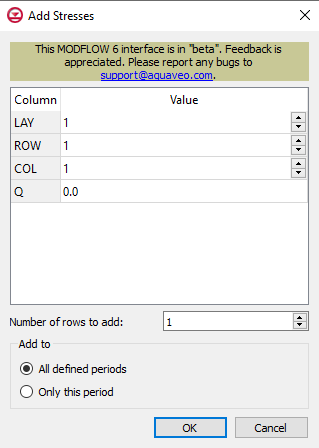
The
Add Stresses dialog for the HFB package
The Add Stresses dialog is accessed by clicking Add Rows  in the Periods section of several MODFLOW 6 package dialogs. It contains the following sections and options:
- Table – Table Options differ according to each package. See chart below.
- Number of rows to add – Use the Increment Up and Down
 buttons to select the desired number of rows to add.
- Add to section – Radio buttons with the following options:
- All defined periods – Select to add the rows to all defined periods.
- Only this period – Select to add the rows to only this period.
| Package
|
Add Stresses Dialog Table Options
|
| CHD
|
| CHD Options
|
- LAY – Used to specify certain layers.
- ROW – Used to specify certain rows.
- COL – Used to specify certain columns.
- HEAD – Represents the head at the boundary.
|
|
| DRN
|
| DRN Options
|
- LAY – Used to specify which layer is being applied.
- ROW – Used to specify which row is being applied.
- COL – Used to specify which column is being applied.
- ELEV – Represents the elevation of the drain.
- COND – Represents the hydraulic conductance between the aquifer and the drain.
|
|
| GHB
|
| GHB Options
|
- LAY – Used to specify certain layers of the module.
- ROW – Used to specify which row is being applied.
- COL – Used to specify which column is being applied.
- BHEAD – Represents the boundary head.
- COND – Represents the hydraulic conductance between the aquifer cell and the boundary.
|
|
| HFB
|
| HFB Options
|
- LAY1 – Represents the first of two chosen layers.
- ROW1 – Represents the first of two chosen rows.
- COL1 – Represents the first of two chosen columns.
- LAY2 – Represents the second of two chosen layers.
- ROW2 – Represents the second of two chosen rows.
- COL2 – Represents the second of two chosen columns.
- HYDCHR – The hydraulic characteristic of the horizontal-flow barrier. When this variable is negative it multiplied by the conductance of two cells.
|
|
| LAK
|
| LAK Options
|
- LAKENO_OUTLETNO – A value that defines the reach number associated with the specified PERIOD data.
- SETTING – Information that is linked to keywords and values.
- VALUE1 – Value to be entered in relation to the specific project.
- VALUE2 – Value to be entered in relation to the specific project.
|
|
| MAW
|
| MAW Options
|
- WELLNO – A value that defines the reach number associated with the specified PERIOD data.
- MAWSETTING – Information that is linked to keywords and values.
- VALUE1 – Value to be entered in relation to the specific project.
- VALUE2 – Value to be entered in relation to the specific project.
- VALUE3 – Value to be entered in relation to the specific project.
|
|
| RIV
|
| RIV Options
|
- LAY – Used to specify which row is being applied.
- ROW – Used to specify which row is being applied.
- COL – Used to specify which column is being applied.
- STAGE – Variable that represents the head in the river.
- COND – Variable that represents the riverbed hydraulic conductance.
- RBOT – Variable that represents the elevation of the bottom of the riverbed.
|
|
| SFR
|
| SFR Options
|
- RNO – A value that defines the reach number associated with the specified PERIOD data.
- SFRSETTING – Information that is linked to keywords and values.
- VALUE1 – Value to be entered in relation to the specific project.
- VALUE2 – Value to be entered in relation to the specific project.
|
|
| UZF
|
| UZF Options
|
- IUZNO – An integer value that defines the UZF cell number associated with the specified PERIOD data on the line.
- FINF – A value that defines the applied infiltration rate of the UZF cell.
- PET – A value that defines the ET rate of the UZF cell and specified GWF cell.
- EXDP – A value that defines the ET extinction depth of the UZF cell.
- EXTWC – A value that defines the amount of water removed from the UZF cell through evapotranspiration.
- HA – A value that defines the amount of potential air that enters the UZF cell.
- HROOT – A value that defines the root potential of the UZF cell.
- ROOTACT – A value that defines how much root activity exists in the UZF cell.
|
|
| WEL
|
| WEL Options
|
- LAY – Represents which layer within the grid to which the chosen well will be assigned.
- ROW – Represents which row within the grid to which the chosen well will be assigned.
- COL – Represents which column within the grid to which the chosen well will be assigned.
- Q – Represents the volumetric well rate at which the recharge (positive value) and discharge (negative value) of the well will be.
|
|
Related Topics


