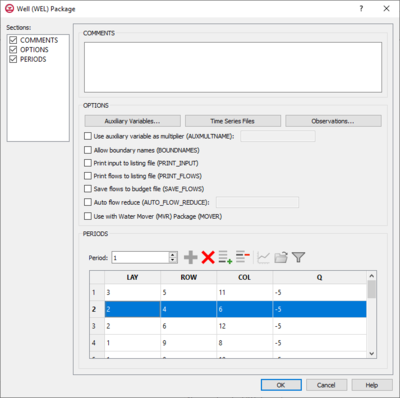
User:Jmonson/MODFLOW 6 Packages: Difference between revisions
From XMS Wiki
Jump to navigationJump to search
(→UZF) |
No edit summary |
||
| (262 intermediate revisions by 3 users not shown) | |||
| Line 1: | Line 1: | ||
__NOINDEX__ | __NOINDEX__ | ||
{{ | {{Version GMS 10.5}} | ||
{{MODFLOW Links}} | {{MODFLOW 6 Links}} | ||
There are many different packages available in MODFLOW 6. | There are many different packages available in MODFLOW 6. | ||
| Line 22: | Line 22: | ||
***"Years" | ***"Years" | ||
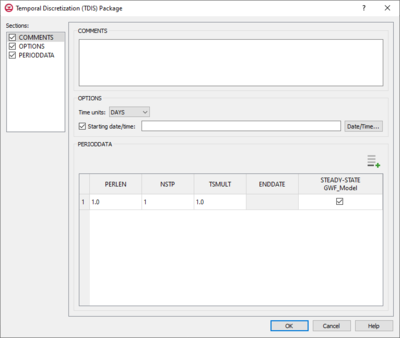
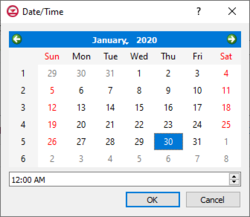
**''Start date/time'' – Turn on to enable setting a start date/time. Click the '''Date/Time...''' button to bring up the [[#Date/Time Dialog|''Date/Time'' dialog]]. The time can also be manually entered using "YYYY-MM-DDTHH:MM:SS" format. The "T" in the middle divides the date from the time. | **''Start date/time'' – Turn on to enable setting a start date/time. Click the '''Date/Time...''' button to bring up the [[#Date/Time Dialog|''Date/Time'' dialog]]. The time can also be manually entered using "YYYY-MM-DDTHH:MM:SS" format. The "T" in the middle divides the date from the time. | ||
*''PeriodData'' section – Contains a spreadsheet listing periods. An [[File: | *''PeriodData'' section – Contains a spreadsheet listing periods. An [[File:Row-add.svg|12px]] '''Add Row''' button is found at the top rigth of the spreadsheet. Right-clicking on the row number in the spreadsheet gives a menu that allows inserting, deleting, copying, or pasting a row. The columns in the spreadsheet include: | ||
**''PERLEN'' – The length of a stress period. The default value is "1.0". | **''PERLEN'' – The length of a stress period. The default value is "1.0". | ||
**''NSTP'' – The number of time steps in a stress period. The default value is "1". | **''NSTP'' – The number of time steps in a stress period. The default value is "1". | ||
| Line 122: | Line 122: | ||
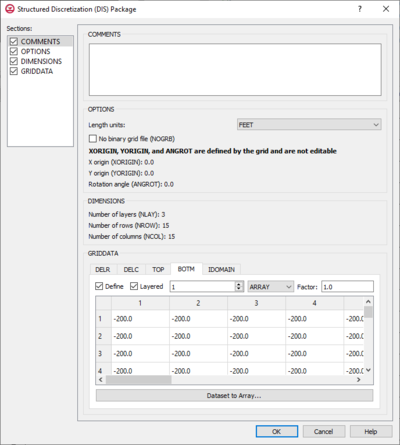
***If "Constant" is selected from the drop-down, enter a decimal value in the ''Constant'' field to be applied to all cells in the bottom model layer(s). | ***If "Constant" is selected from the drop-down, enter a decimal value in the ''Constant'' field to be applied to all cells in the bottom model layer(s). | ||
***If "Array" is selected from the drop-down, a user-editable array appears below the drop-down. Enter a decimal ''Factor'' value to the right of the drop-down. The individual elements of the array are multiplied by the factor value after they are read. | ***If "Array" is selected from the drop-down, a user-editable array appears below the drop-down. Enter a decimal ''Factor'' value to the right of the drop-down. The individual elements of the array are multiplied by the factor value after they are read. | ||
***'''Dataset to Array...''' – Click to open the ''Select Dataset'' dialog. Select the desired database(s) | ***'''Dataset to Array...''' – Click to open the ''Select Dataset'' dialog. Select the desired database(s) in this dialog. | ||
**''IDOMAIN'' – Optional. Characterizes the existence status of a cell. Setting a value of "0" for a particular cell inactivates that cell so it is not used in the simulation. | **''IDOMAIN'' – Optional. Characterizes the existence status of a cell. Setting a value of "0" for a particular cell inactivates that cell so it is not used in the simulation. | ||
***''Define'' – Turn on to define an IDOMAIN. | ***''Define'' – Turn on to define an IDOMAIN. | ||
| Line 128: | Line 128: | ||
***If "Constant" is selected from the drop-down, enter a decimal value in the ''Constant'' field to be applied to all cells in the IDOMAIN layer(s). | ***If "Constant" is selected from the drop-down, enter a decimal value in the ''Constant'' field to be applied to all cells in the IDOMAIN layer(s). | ||
***If "Array" is selected from the drop-down, a user-editable array appears below the drop-down. Enter a decimal ''Factor'' value to the right of the drop-down. The individual elements of the array are multiplied by the factor value after they are read. | ***If "Array" is selected from the drop-down, a user-editable array appears below the drop-down. Enter a decimal ''Factor'' value to the right of the drop-down. The individual elements of the array are multiplied by the factor value after they are read. | ||
***'''Dataset to Array...''' – Click to open the ''Select Dataset'' dialog. Select the desired database(s) | ***'''Dataset to Array...''' – Click to open the ''Select Dataset'' dialog. Select the desired database(s) in this dialog. | ||
===Node Property Flow (NPF) Package=== | ===Node Property Flow (NPF) Package=== | ||
| Line 139: | Line 139: | ||
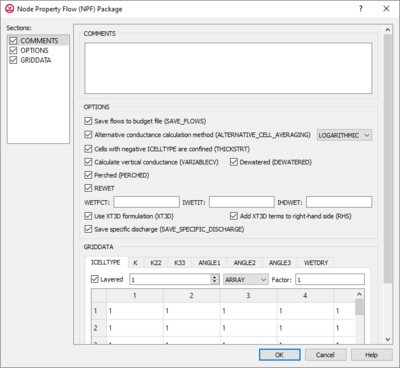
*''Comments'' section – Enter general alphanumeric comments. Comments entered here get written at the top of the file, preceded by a '#' symbol. | *''Comments'' section – Enter general alphanumeric comments. Comments entered here get written at the top of the file, preceded by a '#' symbol. | ||
*''Options'' section | *''Options'' section | ||
**''Save flows to budget file (SAVE_FLOWS)'' – Turn on to write cell-by-cell flow terms to the file specified with "BUDGET SAVE FILE" in [[GMS: | **''Save flows to budget file (SAVE_FLOWS)'' – Turn on to write cell-by-cell flow terms to the file specified with "BUDGET SAVE FILE" in [[GMS:MF6 OC Package|Output Control]]. | ||
**''Alternative conductance calculation method (ALTERNATIVE_CELL_AVERAGING)'' – Turn on to use an alternative method for calculating the conductance for horizontal cell connections. | **''Alternative conductance calculation method (ALTERNATIVE_CELL_AVERAGING)'' – Turn on to use an alternative method for calculating the conductance for horizontal cell connections. | ||
***"Logarithmic" – | ***"Logarithmic" – | ||
| Line 154: | Line 154: | ||
**''Use XT3D formulation (XT3D)'' – Turn on to use the XT3D formulation. | **''Use XT3D formulation (XT3D)'' – Turn on to use the XT3D formulation. | ||
***''Add XT3D terms to right-hand side (RHS)'' – The XT3D additional terms will be added to the right-hand side instead of the coefficient matrix. | ***''Add XT3D terms to right-hand side (RHS)'' – The XT3D additional terms will be added to the right-hand side instead of the coefficient matrix. | ||
**''Save specific discharge (SAVE_SPECIFIC_DISCHARGE)'' – Turn on to calculate x, y, and z components of specific discharge at cell centers and write them to the cell-by-cell flow file as specified with "BUDGET SAVE FILE" in [[GMS: | **''Save specific discharge (SAVE_SPECIFIC_DISCHARGE)'' – Turn on to calculate x, y, and z components of specific discharge at cell centers and write them to the cell-by-cell flow file as specified with "BUDGET SAVE FILE" in [[GMS:MF6 OC Package|Output Control]]. | ||
*''GridData'' section – Contains a number of tabs, including: | *''GridData'' section – Contains a number of tabs, including: | ||
**''ICELLTYPE'' – A flag for each cell that specifies how saturated thickness is treated. | **''ICELLTYPE'' – A flag for each cell that specifies how saturated thickness is treated. | ||
| Line 160: | Line 160: | ||
***If "Constant" is selected from the drop-down, enter a decimal value in the ''Constant'' field to be applied to all cells in the layer(s). | ***If "Constant" is selected from the drop-down, enter a decimal value in the ''Constant'' field to be applied to all cells in the layer(s). | ||
***If "Array" is selected from the drop-down, a user-editable array appears below the drop-down. Enter a decimal ''Factor'' value to the right of the drop-down. The individual elements of the array are multiplied by the factor value after they are read. | ***If "Array" is selected from the drop-down, a user-editable array appears below the drop-down. Enter a decimal ''Factor'' value to the right of the drop-down. The individual elements of the array are multiplied by the factor value after they are read. | ||
***'''Dataset to Array...''' – Click to open the ''Select Dataset'' dialog. Select the desired database(s) | ***'''Dataset to Array...''' – Click to open the ''Select Dataset'' dialog. Select the desired database(s) in this dialog. | ||
**''K'' – The hydraulic conductivity. | **''K'' – The hydraulic conductivity. | ||
***''Layered'' – Turn on if there is more than one affected layer. Select the desired layer from the drop down in order to edit the array (if "Array" is selected from the drop-down). | ***''Layered'' – Turn on if there is more than one affected layer. Select the desired layer from the drop down in order to edit the array (if "Array" is selected from the drop-down). | ||
***If "Constant" is selected from the drop-down, enter a decimal value in the ''Constant'' field to be applied to all cells in the layer(s). | ***If "Constant" is selected from the drop-down, enter a decimal value in the ''Constant'' field to be applied to all cells in the layer(s). | ||
***If "Array" is selected from the drop-down, a user-editable array appears below the drop-down. Enter a decimal ''Factor'' value to the right of the drop-down. The individual elements of the array are multiplied by the factor value after they are read. | ***If "Array" is selected from the drop-down, a user-editable array appears below the drop-down. Enter a decimal ''Factor'' value to the right of the drop-down. The individual elements of the array are multiplied by the factor value after they are read. | ||
***'''Dataset to Array...''' – Click to open the ''Select Dataset'' dialog. Select the desired database(s) | ***'''Dataset to Array...''' – Click to open the ''Select Dataset'' dialog. Select the desired database(s) in this dialog. | ||
**''K22'' – The hydraulic conductivity of the second ellipsoid axis. | **''K22'' – The hydraulic conductivity of the second ellipsoid axis. | ||
***''Define'' – Turn on if K22 needs to be defined. | ***''Define'' – Turn on if K22 needs to be defined. | ||
| Line 171: | Line 171: | ||
***If "Constant" is selected from the drop-down, enter a decimal value in the ''Constant'' field to be applied to all cells in the layer(s). | ***If "Constant" is selected from the drop-down, enter a decimal value in the ''Constant'' field to be applied to all cells in the layer(s). | ||
***If "Array" is selected from the drop-down, a user-editable array appears below the drop-down. Enter a decimal ''Factor'' value to the right of the drop-down. The individual elements of the array are multiplied by the factor value after they are read. | ***If "Array" is selected from the drop-down, a user-editable array appears below the drop-down. Enter a decimal ''Factor'' value to the right of the drop-down. The individual elements of the array are multiplied by the factor value after they are read. | ||
***'''Dataset to Array...''' – Click to open the ''Select Dataset'' dialog. Select the desired database(s) | ***'''Dataset to Array...''' – Click to open the ''Select Dataset'' dialog. Select the desired database(s) in this dialog. | ||
**''K33'' – The hydraulic conductivity of the third ellipsoid axis. | **''K33'' – The hydraulic conductivity of the third ellipsoid axis. | ||
***''Define'' – Turn on if K33 needs to be defined. | ***''Define'' – Turn on if K33 needs to be defined. | ||
| Line 177: | Line 177: | ||
***If "Constant" is selected from the drop-down, enter a decimal value in the ''Constant'' field to be applied to all cells in the layer(s). | ***If "Constant" is selected from the drop-down, enter a decimal value in the ''Constant'' field to be applied to all cells in the layer(s). | ||
***If "Array" is selected from the drop-down, a user-editable array appears below the drop-down. Enter a decimal ''Factor'' value to the right of the drop-down. The individual elements of the array are multiplied by the factor value after they are read. | ***If "Array" is selected from the drop-down, a user-editable array appears below the drop-down. Enter a decimal ''Factor'' value to the right of the drop-down. The individual elements of the array are multiplied by the factor value after they are read. | ||
***'''Dataset to Array...''' – Click to open the ''Select Dataset'' dialog. Select the desired database(s) | ***'''Dataset to Array...''' – Click to open the ''Select Dataset'' dialog. Select the desired database(s) in this dialog. | ||
**''ANGLE1'' – The first sequential rotation angle of the hydraulic conductivity tensor in degrees. | **''ANGLE1'' – The first sequential rotation angle of the hydraulic conductivity tensor in degrees. | ||
***''Define'' – Turn on if ANGLE1 needs to be defined. | ***''Define'' – Turn on if ANGLE1 needs to be defined. | ||
| Line 183: | Line 183: | ||
***If "Constant" is selected from the drop-down, enter a decimal value in the ''Constant'' field to be applied to all cells in the layer(s). | ***If "Constant" is selected from the drop-down, enter a decimal value in the ''Constant'' field to be applied to all cells in the layer(s). | ||
***If "Array" is selected from the drop-down, a user-editable array appears below the drop-down. Enter a decimal ''Factor'' value to the right of the drop-down. The individual elements of the array are multiplied by the factor value after they are read. | ***If "Array" is selected from the drop-down, a user-editable array appears below the drop-down. Enter a decimal ''Factor'' value to the right of the drop-down. The individual elements of the array are multiplied by the factor value after they are read. | ||
***'''Dataset to Array...''' – Click to open the ''Select Dataset'' dialog. Select the desired database(s) | ***'''Dataset to Array...''' – Click to open the ''Select Dataset'' dialog. Select the desired database(s) in this dialog. | ||
**''ANGLE2'' – The second sequential rotation angle of the hydraulic conductivity tensor in degrees. | **''ANGLE2'' – The second sequential rotation angle of the hydraulic conductivity tensor in degrees. | ||
***''Define'' – Turn on if ANGLE2 needs to be defined. | ***''Define'' – Turn on if ANGLE2 needs to be defined. | ||
| Line 189: | Line 189: | ||
***If "Constant" is selected from the drop-down, enter a decimal value in the ''Constant'' field to be applied to all cells in the layer(s). | ***If "Constant" is selected from the drop-down, enter a decimal value in the ''Constant'' field to be applied to all cells in the layer(s). | ||
***If "Array" is selected from the drop-down, a user-editable array appears below the drop-down. Enter a decimal ''Factor'' value to the right of the drop-down. The individual elements of the array are multiplied by the factor value after they are read. | ***If "Array" is selected from the drop-down, a user-editable array appears below the drop-down. Enter a decimal ''Factor'' value to the right of the drop-down. The individual elements of the array are multiplied by the factor value after they are read. | ||
***'''Dataset to Array...''' – Click to open the ''Select Dataset'' dialog. Select the desired database(s) | ***'''Dataset to Array...''' – Click to open the ''Select Dataset'' dialog. Select the desired database(s) in this dialog. | ||
**''ANGLE3'' – The third sequential rotation angle of the hydraulic conductivity tensor in degrees. | **''ANGLE3'' – The third sequential rotation angle of the hydraulic conductivity tensor in degrees. | ||
***''Define'' – Turn on if ANGLE3 needs to be defined. | ***''Define'' – Turn on if ANGLE3 needs to be defined. | ||
| Line 195: | Line 195: | ||
***If "Constant" is selected from the drop-down, enter a decimal value in the ''Constant'' field to be applied to all cells in the layer(s). | ***If "Constant" is selected from the drop-down, enter a decimal value in the ''Constant'' field to be applied to all cells in the layer(s). | ||
***If "Array" is selected from the drop-down, a user-editable array appears below the drop-down. Enter a decimal ''Factor'' value to the right of the drop-down. The individual elements of the array are multiplied by the factor value after they are read. | ***If "Array" is selected from the drop-down, a user-editable array appears below the drop-down. Enter a decimal ''Factor'' value to the right of the drop-down. The individual elements of the array are multiplied by the factor value after they are read. | ||
***'''Dataset to Array...''' – Click to open the ''Select Dataset'' dialog. Select the desired database(s) | ***'''Dataset to Array...''' – Click to open the ''Select Dataset'' dialog. Select the desired database(s) in this dialog. | ||
**''WETDRY'' – A combination of the wetting threshold and a flag to indicate which neighboring cells can cause a cell to become wet. | **''WETDRY'' – A combination of the wetting threshold and a flag to indicate which neighboring cells can cause a cell to become wet. | ||
***''Define'' – Turn on if WETDRY needs to be defined. | ***''Define'' – Turn on if WETDRY needs to be defined. | ||
| Line 201: | Line 201: | ||
***If "Constant" is selected from the drop-down, enter a decimal value in the ''Constant'' field to be applied to all cells in the layer(s). | ***If "Constant" is selected from the drop-down, enter a decimal value in the ''Constant'' field to be applied to all cells in the layer(s). | ||
***If "Array" is selected from the drop-down, a user-editable array appears below the drop-down. Enter a decimal ''Factor'' value to the right of the drop-down. The individual elements of the array are multiplied by the factor value after they are read. | ***If "Array" is selected from the drop-down, a user-editable array appears below the drop-down. Enter a decimal ''Factor'' value to the right of the drop-down. The individual elements of the array are multiplied by the factor value after they are read. | ||
***'''Dataset to Array...''' – Click to open the ''Select Dataset'' dialog. Select the desired database(s) | ***'''Dataset to Array...''' – Click to open the ''Select Dataset'' dialog. Select the desired database(s) in this dialog. | ||
===Initial Conditions (IC) Package=== | ===Initial Conditions (IC) Package=== | ||
| Line 215: | Line 215: | ||
***If "Constant" is selected from the drop-down, enter a decimal value in the ''Constant'' field to be applied to all cells in the layer(s). | ***If "Constant" is selected from the drop-down, enter a decimal value in the ''Constant'' field to be applied to all cells in the layer(s). | ||
***If "Array" is selected from the drop-down, a user-editable array appears below the drop-down. Enter a decimal ''Factor'' value to the right of the drop-down. The individual elements of the array are multiplied by the factor value after they are read. | ***If "Array" is selected from the drop-down, a user-editable array appears below the drop-down. Enter a decimal ''Factor'' value to the right of the drop-down. The individual elements of the array are multiplied by the factor value after they are read. | ||
***'''Dataset to Array...''' – Click to open the ''Select Dataset'' dialog. Select the desired database(s) | ***'''Dataset to Array...''' – Click to open the ''Select Dataset'' dialog. Select the desired database(s) in this dialog. | ||
{{-}} | {{-}} | ||
===Constant-Head (CHD) Package=== | ===Constant-Head (CHD) Package=== | ||
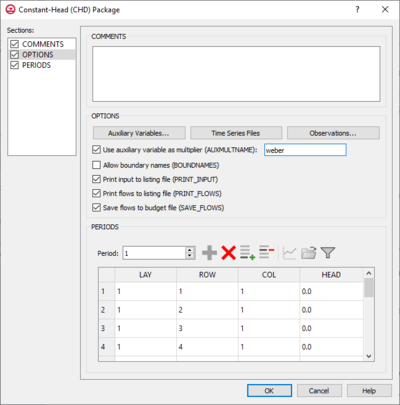
[[File:GMS MODFLOW 6 - Constant-Head (CHD) Package dialog.png|thumb|400px|right|The ''Constant-Head (CHD) Package'' dialog]] | [[File:GMS MODFLOW 6 - Constant-Head (CHD) Package dialog.png|thumb|400px|right|The ''Constant-Head (CHD) Package'' dialog]] | ||
| Line 232: | Line 233: | ||
**''Allow boundary names (BOUNDNAMES)'' – Turn on to allow boundary names to be included in the list of constant-head cells. | **''Allow boundary names (BOUNDNAMES)'' – Turn on to allow boundary names to be included in the list of constant-head cells. | ||
**''Print input to listing file (PRINT_INPUT)'' – Turn on to write the list of constant-head information to the listing file immediately after it is read. | **''Print input to listing file (PRINT_INPUT)'' – Turn on to write the list of constant-head information to the listing file immediately after it is read. | ||
**''Print flows to listing file (PRINT_FLOWS)'' – Turn on to write the list of constant-head flow rates to the listing file for every stress period time step in which "BUDGET PRINT" is specified in [[GMS: | **''Print flows to listing file (PRINT_FLOWS)'' – Turn on to write the list of constant-head flow rates to the listing file for every stress period time step in which "BUDGET PRINT" is specified in [[GMS:MF6 OC Package|Output Control]]. | ||
**''Save flows to budget file (SAVE_FLOWS)'' – Turn on to write constant-head flow terms to the file specified with "BUDGET FILEOUT" in [[GMS: | **''Save flows to budget file (SAVE_FLOWS)'' – Turn on to write constant-head flow terms to the file specified with "BUDGET FILEOUT" in [[GMS:MF6 OC Package|Output Control]]. | ||
**''Use with Water Mover (MVR) package (MOVER)'' – Turn on to allows this instance of the Constant-Head Package to be used with the Water Mover (MVR) Package. | **''Use with Water Mover (MVR) package (MOVER)'' – Turn on to allows this instance of the Constant-Head Package to be used with the Water Mover (MVR) Package. | ||
*''Periods'' section – Contains the following: | *''Periods'' section – Contains the following: | ||
| Line 239: | Line 240: | ||
**'''Define Period''' [[File:Add Note Icon.svg|14px]] – If no period is defined, click to make the spreadsheet editable. | **'''Define Period''' [[File:Add Note Icon.svg|14px]] – If no period is defined, click to make the spreadsheet editable. | ||
**'''Delete Period''' [[File:GMS Delete Icon.svg|14px]] – Click to delete the existing period. | **'''Delete Period''' [[File:GMS Delete Icon.svg|14px]] – Click to delete the existing period. | ||
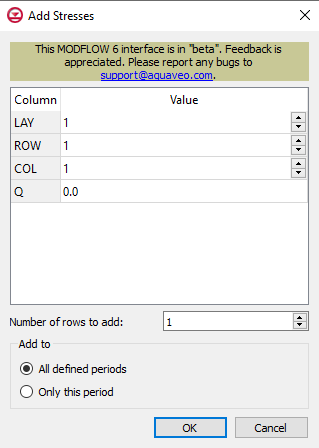
**'''Add Rows''' [[File: | **'''Add Rows''' [[File:Row-add.svg|14px]] – Click to bring up the [[#Add Stresses Dialog|''Add Stresses'' dialog]]. | ||
**'''Delete Rows''' [[File: | **'''Delete Rows''' [[File:Row-delete.svg|14px]] – Click to bring up a dialog with three options: | ||
***'''Delete from All Periods''' – Click to delete matching stresses from all periods. | ***'''Delete from All Periods''' – Click to delete matching stresses from all periods. | ||
***'''Delete from Just This Period''' – Click to delete matching stresses from just this period. | ***'''Delete from Just This Period''' – Click to delete matching stresses from just this period. | ||
**'''Plot All Periods''' [[File:Mf6time-series.svg|14px]] – Click to bring up the [[GMS:XY Series Editor|''XY Series Editor'' dialog]]. Requires that a cell be selected in the table. | |||
**'''Plot All Periods''' [[File: | **'''Open Time Series''' [[File:Open Macro.svg|14px]] – Only available if a time series has previously been defined, and the time series is specifically called in the ''Head'' column. For example, if a time series named "ts_1" is defined, enter "ts_1" in the Head column of the appropriate row. Click to bring up the | ||
**'''Open Time Series''' [[File:Open Macro.svg|14px]] – Click to bring up the | **'''Filter on Selected Cells''' [[File:Mf6filter.svg|14px]] – Click to turn on filtering on the selected cells. | ||
**'''Filter on Selected Cells''' [[File: | *''Table'' – Contains the following: | ||
**'''LAY''' – Used to specify certain layers of the module. | |||
**'''ROW''' – Used to specify certain rows of the module. | |||
**'''COL''' – Used to specify certain columns of the module. | |||
**'''HEAD''' – Represents the head at the boundary. | |||
===Drain (DRN) Package=== | ===Drain (DRN) Package=== | ||
| Line 263: | Line 268: | ||
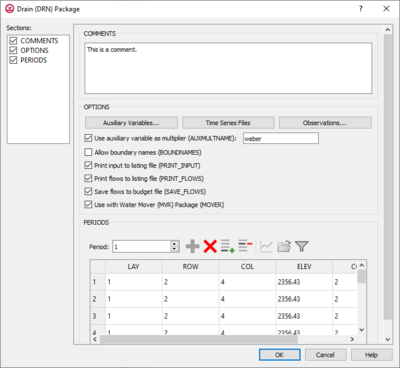
**''Allow boundary names (BOUNDNAMES)'' – Turn on to allow boundary names to be included in the list of drain cells. | **''Allow boundary names (BOUNDNAMES)'' – Turn on to allow boundary names to be included in the list of drain cells. | ||
**''Print input to listing file (PRINT_INPUT)'' – Turn on to write the list of drain information to the listing file immediately after it is read. | **''Print input to listing file (PRINT_INPUT)'' – Turn on to write the list of drain information to the listing file immediately after it is read. | ||
**''Print flows to listing file (PRINT_FLOWS)'' – Turn on to write the list of drain flow rates to the listing file for every stress period time step in which "BUDGET PRINT" is specified in [[GMS: | **''Print flows to listing file (PRINT_FLOWS)'' – Turn on to write the list of drain flow rates to the listing file for every stress period time step in which "BUDGET PRINT" is specified in [[GMS:MF6 OC Package|Output Control]]. | ||
**''Save flows to budget file (SAVE_FLOWS)'' – Turn on to write drain flow terms to the file specified with "BUDGET FILEOUT" in [[GMS: | **''Save flows to budget file (SAVE_FLOWS)'' – Turn on to write drain flow terms to the file specified with "BUDGET FILEOUT" in [[GMS:MF6 OC Package|Output Control]]. | ||
**''Use with Water Mover (MVR) package (MOVER)'' – Turn on to allows this instance of the Drain Package to be used with the Water Mover (MVR) Package. | **''Use with Water Mover (MVR) package (MOVER)'' – Turn on to allows this instance of the Drain Package to be used with the Water Mover (MVR) Package. | ||
*''Periods'' section – Contains the following: | *''Periods'' section – Contains the following: | ||
| Line 270: | Line 275: | ||
**'''Define Period''' [[File:Add Note Icon.svg|14px]] – If no period is defined, click to make the spreadsheet editable. | **'''Define Period''' [[File:Add Note Icon.svg|14px]] – If no period is defined, click to make the spreadsheet editable. | ||
**'''Delete Period''' [[File:GMS Delete Icon.svg|14px]] – Click to delete the existing period. | **'''Delete Period''' [[File:GMS Delete Icon.svg|14px]] – Click to delete the existing period. | ||
**'''Add Rows''' [[File: | **'''Add Rows''' [[File:Row-add.svg|14px]] – Click to bring up the [[#Add Stresses Dialog|''Add Stresses'' dialog]]. | ||
**'''Delete Rows''' [[File: | **'''Delete Rows''' [[File:Row-delete.svg|14px]] – Click to bring up a dialog with three options: | ||
***'''Delete from All Periods''' – Click to delete matching stresses from all periods. | ***'''Delete from All Periods''' – Click to delete matching stresses from all periods. | ||
***'''Delete from Just This Period''' – Click to delete matching stresses from just this period. | ***'''Delete from Just This Period''' – Click to delete matching stresses from just this period. | ||
**'''Plot All Periods''' [[File:Mf6time-series.svg|14px]] – Click to bring up the [[GMS:XY Series Editor|''XY Series Editor'' dialog]]. Requires that a cell be selected in the table. | |||
**'''Plot All Periods''' [[File: | |||
**'''Open Time Series''' [[File:Open Macro.svg|14px]] – Click to bring up the | **'''Open Time Series''' [[File:Open Macro.svg|14px]] – Click to bring up the | ||
**'''Filter on Selected Cells''' [[File: | **'''Filter on Selected Cells''' [[File:Mf6filter.svg|14px]] – Click to turn on filtering on the selected cells. | ||
*''Table'' – Contains the following: | |||
**'''LAY''' – Used to specify certain layers of the module. | |||
**'''ROW''' – Used to specify certain rows of the module. | |||
**'''COL''' – Used to specify certain columns of the module. | |||
**'''ELEV''' – Represents the elevation of the drain. | |||
**'''COND''' – Represents the hydraulic conductance between the aquifer and the drain. | |||
===Evapotranspiration (EVT) Package=== | |||
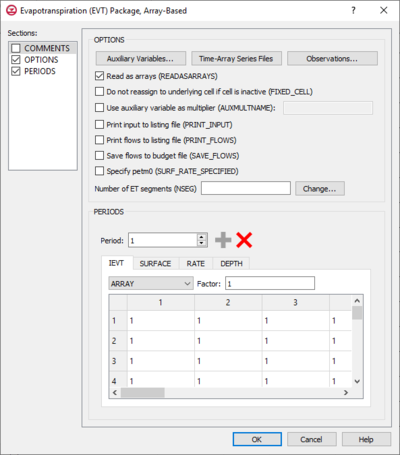
[[File:MF6-EVT Package.png|thumb|400px|right|The ''Evapotranspiration (EVT) Package'' dialog]] | |||
The ''Evapotranspiration (EVT) Package'' dialog is accessed by double-clicking on the EVT package under a MODFLOW 6 simulation in the Project Explorer. It contains the following sections and options: | |||
*''Sections'' list – A list of sections that can be turned on or off: | |||
**''Comments'' – Turn on to make the ''Comments'' section visible. | |||
**''Options'' – Turn on to make the ''Options'' section visible. | |||
**''PeriodData'' – Turn on to make the ''PeriodData'' section visible. This section is on by default. | |||
*''Comments'' section – Enter general alphanumeric comments. Comments entered here get written at the top of the file, preceded by a '#' symbol. | |||
*''Options'' section – Temporal options and settings: | |||
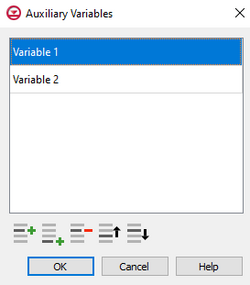
**'''Auxiliary Variables...''' – Click to bring up the [[#Auxiliary Variables Dialog|''Auxiliary Variables'' dialog]]. | |||
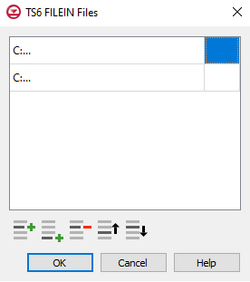
**'''Time Series...''' – Click to bring up the [[#Time Series Files Dialog|''Time Series Files'' dialog]]. | |||
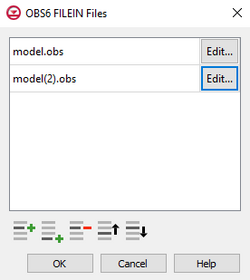
**'''Observations...''' – Click to bring up the [[#Observation Files Dialog|''Observation Files'' dialog]]. | |||
**''Read as arrays (READASARRAYS) – Click to specify to use array-based input in the EVT package. | |||
**''Do not reassign to underlying cell if cell is inactive (FIXED_CELL)'' – Click to indicate that evapotranspiration will not be reassigned to a cell underlying the cell specified in the list if the specified cell is inactive. | |||
**''Use auxiliary variable as multiplier (AUXMULTNAME)'' – Name of auxiliary variable to be used as multiplier of evapotranspiration rate. | |||
**''Print input to listing file (PRINT_INPUT)'' – Turn on to write the list of evapotranspiration information to the listing file immediately after it is read. | |||
**''Print flows to listing file (PRINT_FLOWS)'' – Turn on to write the list of evapotranspiration flow rates to the listing file for every stress period time step in which "BUDGET PRINT" is specified in [[GMS:MF6 OC Package|Output Control]]. | |||
**''Save flows to budget file (SAVE_FLOWS)'' – Turn on to write evapotranspiration flow terms to the file specified with "BUDGET FILEOUT" in [[GMS:MF6 OC Package|Output Control]]. | |||
**''Specify petm0 (SURF_RATE_SPECIFIED)'' – When turned on, indicates that the proportion of the evapotranspiration rate at the ET surface will be specified as PETM0 in list input. | |||
**Number of ET Segments – Allows the documenting of a value that represents the number of ET segments. | |||
***'''Change...''' – Allows an increase or a decrease of the value within the Number of ET Segments field. | |||
*''Periods'' section – Contains the following: | |||
**''Period'' drop-down – Use the '''Increment Up and Down''' [[File:Increment up and down arrows.png|14px]] buttons to select the desired period. | |||
**'''Define Period''' [[File:Add Note Icon.svg|14px]] – If no period is defined, click to make the spreadsheet editable. | |||
**'''Delete Period''' [[File:GMS Delete Icon.svg|14px]] – Click to delete the existing period. | |||
***Table – Contains four tabs: | |||
****''IEVT'' – The layer number that defines the layer in each vertical column. | |||
*****"UNDEFINED" – Indicates that there are no definite variables to be applied. | |||
*****"CONSTANT" – If "Constant" is selected from the drop-down, enter a decimal value in the ''Constant'' field to be applied to all cells in the layer(s). | |||
*****"ARRAY" – If "Array" is selected from the drop-down, enter an integer in the ''factor:'' field to be multiplied to the array after it is read. | |||
*****"TIME-ARRAY SERIES" – Is not supported for ''IEVT'', ''SURFACE'', or ''DEPTH''. | |||
****''SURFACE'' – The elevation of the ET surface. | |||
*****"UNDEFINED" – Indicates that there are no definite variable to be applied. | |||
*****"CONSTANT" – If "Constant" is selected from the drop-down, enter a decimal value in the ''Constant'' field to be applied to all cells in the layer(s). | |||
*****"ARRAY" – If "Array" is selected from the drop-down, enter an integer in the ''factor:'' field to be multiplied to the array after it is read. | |||
*****"TIME-ARRAY SERIES" – Is not supported for ''IEVT'', ''SURFACE'', or ''DEPTH''. | |||
****''RATE'' – The maximum ET flux rate. | |||
*****"UNDEFINED" – Indicates that there are no definite variables to be applied. | |||
*****"CONSTANT" – If "Constant" is selected from the drop-down, enter a decimal value in the ''Constant'' field to be applied to all cells in the layer(s). | |||
*****"ARRAY" – If "Array" is selected from the drop-down, enter an integer in the ''factor:'' field to be multiplied to the array after it is read. | |||
*****"TIME-ARRAY SERIES" – If "Time-Array Series" is selected from the drop-down, indicate which Time-Array Series is being applied in the ''Series:'' field. | |||
****''DEPTH'' – The ET extinction depth. | |||
*****"UNDEFINED" – Indicates that there are no definite variable to be applied. | |||
*****"CONSTANT" – If "Constant" is selected from the drop-down, enter a decimal value in the ''Constant'' field to be applied to all cells in the layer(s). | |||
*****"ARRAY" – If "Array" is selected from the drop-down, enter an integer in the ''factor:'' field to be multiplied to the array after it is read. | |||
*****"TIME-ARRAY SERIES" – Is not supported for ''IEVT'', ''SURFACE'', or ''DEPTH''. | |||
{{-}} | {{-}} | ||
===GHB=== | |||
[[File: | ===General-Head (GHB) Package=== | ||
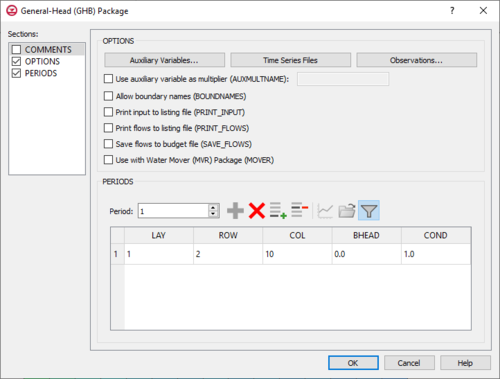
[[File:MF6-GHB Package.png|thumb|500px|right|The ''General-Head (GHB) Package'' dialog]] | |||
The ''General-Head (GHB) Package'' dialog is accessed by double-clicking on the GHB package under a MODFLOW 6 simulation in the Project Explorer. It contains the following sections and options: | |||
*''Sections'' list – A list of sections that can be turned on or off: | |||
**''Comments'' – Turn on to make the ''Comments'' section visible. | |||
**''Options'' – Turn on to make the ''Options'' section visible. | |||
**''Periods'' – Turn on to make the ''Periods'' section visible. This section is on by default. | |||
*''Comments'' section – Enter general alphanumeric comments. Comments entered here get written at the top of the file, preceded by a '#' symbol. | |||
*''Options'' section – Contains the following: | |||
**'''Auxiliary Variables...''' – Click to bring up the [[#Auxiliary Variables Dialog|''Auxiliary Variables'' dialog]]. | |||
**'''Time Series...''' – Click to bring up the [[#Time Series Files Dialog|''Time Series Files'' dialog]]. | |||
**'''Observations...''' – Click to bring up the [[#Observation Files Dialog|''Observation Files'' dialog]]. | |||
**''Use auxiliary variable as multiplier (AUXMULTNAME)'' – Name of auxiliary variable to be used as multiplier of general-head boundary conductance. | |||
**''Allow boundary names (BOUNDNAMES)'' – Turn on to allow boundary names to be included in the list of general-head boundary cells. | |||
**''Print input to listing file (PRINT_INPUT)'' – Turn on to write the list of general-head boundary information to the listing file immediately after it is read. | |||
**''Print flows to listing file (PRINT_FLOWS)'' – Turn on to write the list of general-head boundary flow rates to the listing file for every stress period time step in which "BUDGET PRINT" is specified in [[GMS:MF6 OC Package|Output Control]]. | |||
**''Save flows to budget file (SAVE_FLOWS)'' – Turn on to write general-head flow terms to the file specified with "BUDGET FILEOUT" in [[GMS:MF6 OC Package|Output Control]]. | |||
**''Use with Water Mover (MVR) package (MOVER)'' – Turn on to allows this instance of the General-Head Package to be used with the Water Mover (MVR) Package. | |||
*''Periods'' section – Contains the following: | |||
**''Period'' drop-down – Use the '''Increment Up and Down''' [[File:Increment up and down arrows.png|14px]] buttons to select the desired period. | |||
**'''Define Period''' [[File:Add Note Icon.svg|14px]] – If no period is defined, click to make the spreadsheet editable. | |||
**'''Delete Period''' [[File:GMS Delete Icon.svg|14px]] – Click to delete the existing period. | |||
**'''Add Rows''' [[File:Row-add.svg|14px]] – Click to bring up the [[#Add Stresses Dialog|''Add Stresses'' dialog]]. | |||
**'''Delete Rows''' [[File:Row-delete.svg|14px]] – Click to bring up a dialog with three options: | |||
***'''Delete from All Periods''' – Click to delete matching stresses from all periods. | |||
***'''Delete from Just This Period''' – Click to delete matching stresses from just this period. | |||
**'''Plot All Periods''' [[File:Mf6time-series.svg|14px]] – Click to bring up the [[GMS:XY Series Editor|''XY Series Editor'' dialog]]. Requires that a cell be selected in the table. | |||
**'''Open Time Series''' [[File:Open Macro.svg|14px]] – Click to bring up the | |||
**'''Filter on Selected Cells''' [[File:Mf6filter.svg|14px]] – Click to turn on filtering on the selected cells. | |||
*''Table'' – Contains the following: | |||
**'''LAY''' – Used to specify certain layers of the module. | |||
**'''ROW''' – Used to specify certain rows of the module. | |||
**'''COL''' – Used to specify certain columns of the module. | |||
**'''BHEAD''' – Represents the boundary head. | |||
**'''COND''' – Represents the hydraulic conductance between the aquifer cell and the boundary. | |||
{{-}} | {{-}} | ||
===GNC=== | |||
[[File: | ===Ghost-Node Correction (GNC) Package=== | ||
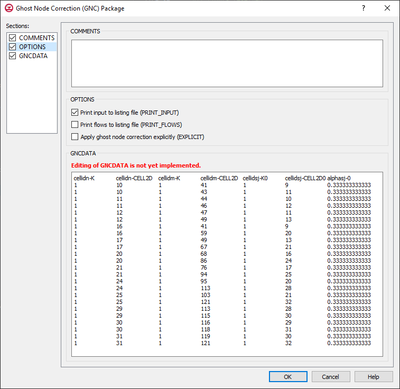
[[File:MF6-gnc package.png|thumb|400px|right|The ''Ghost Node Correction (GNC) Package'' dialog]] | |||
**''Comments'' – Turn on to make the ''Comments'' section visible. | |||
**''Options'' – Turn on to make the ''Options'' section visible. | |||
**''GNCData'' – Turn on to make the ''GNCData'' section visible. This section is on by default. | |||
*''Comments'' section – Enter general alphanumeric comments. Comments entered here get written at the top of the file, preceded by a '#' symbol. | |||
*''Options'' section – Temporal options and settings: | |||
**''Print input to listing file (PRINT_INPUT)'' – If turned on, indicates that the list of GNC information will be written to the listing file after it is read. | |||
**''Print flows to listing file (PRINT_FLOWS)'' – If turned on, indicates that a list of GNC flow rates will be printed to the listing file. | |||
**''Apply ghost node correction explicitly (EXPLICIT)'' – Indicates that the ghost node correction is applied and the correction terms are added to the right-hand side of the matrix. | |||
*''GNCData'' – Area where data specific to GNC and the Ghost Nodes can be reviewed. | |||
{{-}} | {{-}} | ||
===HFB=== | |||
[[File: | ===Horizontal Flow Barrier (HFB) Package=== | ||
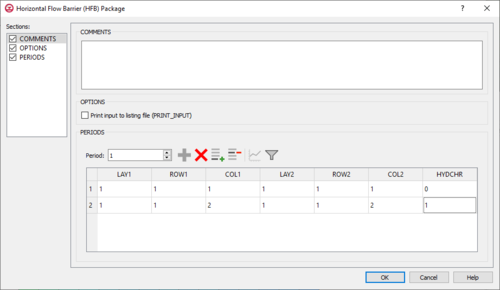
[[File:MF6-HFB package.png|thumb|500px|right|The ''Horizontal Flow Barrier (HFB) Package'' dialog]] | |||
The ''Horizontal Flow Barrier (HFB) Package'' dialog is accessed by double-clicking on the HFB package under a MODFLOW 6 simulation in the Project Explorer. It contains the following sections and options: | |||
*''Sections'' list – A list of sections that can be turned on or off: | |||
**''Comments'' – Turn on to make the ''Comments'' section visible. | |||
**''Options'' – Turn on to make the ''Options'' section visible. | |||
**''Periods'' – Turn on to make the ''Periods'' section visible. This section is on by default. | |||
*''Comments'' section – Enter general alphanumeric comments. Comments entered here get written at the top of the file, preceded by a '#' symbol. | |||
*''Options'' section – Temporal options and settings: | |||
**''Print input to listing file (PRINT_INPUT)'' – Turn on to write the list of recharge information to the listing file immediately after it is read. | |||
*''Periods'' section – Contains the following: | |||
**''Period'' drop-down – Use the '''Increment Up and Down''' [[File:Increment up and down arrows.png|14px]] buttons to select the desired period. | |||
**'''Define Period''' [[File:Add Note Icon.svg|14px]] – If no period is defined, click to make the spreadsheet editable. | |||
**'''Delete Period''' [[File:GMS Delete Icon.svg|14px]] – Click to delete the existing period. | |||
*''Table'' – Contains the following: | |||
**'''LAY1''' – Identifier for the first layer. | |||
**'''ROW1''' – Identifier for the first row. | |||
**'''COL1''' – Identifier for the first column. | |||
**'''LAY2''' – Identifier for the second layer. | |||
**'''ROW2''' – Identifier for the second row. | |||
**'''COL2''' – Identifier for the second column. | |||
**'''HYDCHR''' – The hydraulic characteristic of the horizontal-flow barrier. When this variable is negative it multiplied by the conductance of two cells. | |||
{{-}} | {{-}} | ||
===LAK=== | |||
[[File: | ===Lake (LAK) Package=== | ||
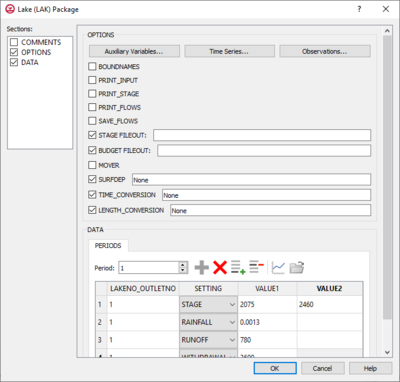
[[File:MF6-LAK package.png|thumb|400px|right|The ''Lake (LAK) Package'' dialog]] | |||
The 'Lake (LAK) Package'' dialog is accessed by double-clicking on the WEL package under a MODFLOW 6 simulation in the Project Explorer. It contains the following sections and options: | |||
*''Sections'' list – A list of sections that can be turned on or off: | |||
**''Comments'' – Turn on to make the ''Comments'' section visible. | |||
**''Options'' – Turn on to make the ''Options'' section visible. | |||
**''Data'' – Turn on to make the ''Data'' section visible. This section is on by default. | |||
*''Comments'' section – Enter general alphanumeric comments. Comments entered here get written at the top of the file, preceded by a '#' symbol. | |||
*''Options'' section – Temporal options and settings: | |||
**'''Auxiliary Variables...''' – Click to bring up the [[#Auxiliary Variables Dialog|''Auxiliary Variables'' dialog]]. | |||
**'''Time Series...''' – Click to bring up the [[#Time Series Files Dialog|''Time Series Files'' dialog]]. | |||
**'''Observations...''' – Click to bring up the [[#Observation Files Dialog|''Observation Files'' dialog]]. | |||
*''Options'' section – Temporal options and settings: | |||
**''BOUNDNAMES'' – If turned on, indicates that the list of lake cells will be provided with the associative boundary names. | |||
**''PRINT_INPUT'' – If turned on, indicates that the list of lake information will be written to the listing file after it is read. | |||
**''PRINT_STAGE'' – If turned on, indicates that lake stages will be printed to the listing file for each stress period if "HEAD PRINT" is specified. | |||
**''PRINT_FLOWS'' – If turned on, indicates that a list of lake flow rates will be printed to the listing file. | |||
**''SAVE_FLOWS'' – If turned on, indicates that the lake flow terms will be written to a specified file. | |||
**''STAGE FILEOUT'' – Indicates that the record corresponds to a specific stage. Also allows the written indication of stage information. | |||
**''BUDGET FILEOUT'' – Allows the specification of a file to which desired flow terms will be written. | |||
**''NO_WELL_STORAGE'' – If turned on, indicates that well storage will not be included in the continuity equation. It is used to control discharge rate oscillations. | |||
**''SUPERFDEP'' – When turned on, allows the a written value that defines the surface depression depth of the lake. | |||
**''MOVER'' – When turned on, indicates that the Lake (Lak) Package, in this instance can be used in collaboration with the Water Mover (MVR) Package. | |||
**''TIME_CONVERSION'' – Value that is used in converting outlet flow terms into time units. | |||
**''LENGTH_CONVERSION'' – Value that is used in converting outlet flow terms into length units. | |||
*''Data'' section – Contains the following: | |||
**''Periods'' drop-down – Use the '''Increment Up and Down''' [[File:Increment up and down arrows.png|14px]] buttons to select the desired period. | |||
**'''Define Period''' [[File:Add Note Icon.svg|14px]] – If no period is defined, click to make the spreadsheet editable. | |||
**'''Delete Period''' [[File:GMS Delete Icon.svg|14px]] – Click to delete the existing period. | |||
**'''Add Rows''' [[File:Row-add.svg|14px]] – Click to bring up the [[#Add Stresses Dialog|''Add Stresses'' dialog]]. | |||
**'''Delete Rows''' [[File:Row-delete.svg|14px]] – Click to bring up a dialog with three options: | |||
***'''Delete from All Periods''' – Click to delete matching stresses from all periods. | |||
***'''Delete from Just This Period''' – Click to delete matching stresses from just this period. | |||
**'''Plot All Periods''' [[File:Mf6time-series.svg|14px]] – Click to bring up the [[GMS:XY Series Editor|''XY Series Editor'' dialog]]. Requires that a cell be selected in the table. | |||
**'''Open Time Series''' [[File:Open Macro.svg|14px]] – Click to bring up the | |||
**'''Filter on Selected Cells''' [[File:Mf6filter.svg|14px]] – Click to turn on filtering on the selected cells. | |||
*''Table'' – Allows the manual input of different variables for the MAW Package. | |||
**'''AKENO_OTLETNO''' – A value that defines the reach number associated with the specified PERIOD data. | |||
**'''SETTING''' – Information that is linked to keywords and values. | |||
**'''VALUE1''' – Value to be entered in relation to the specific project. | |||
**'''VALUE2''' – Value to be entered in relation to the specific project. | |||
{{-}} | {{-}} | ||
===MAW=== | |||
[[File: | ===Multi-Aquifer Well (MAW) Package=== | ||
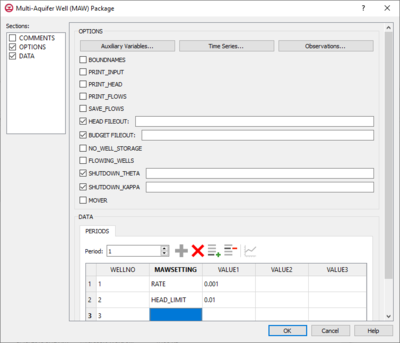
[[File:MF6-MAW Package.png|thumb|400px|right|The ''Multi-Aquifer Well (MAW) Package'' dialog]] | |||
The ''Multi-Aquifer Well (MAW) Package'' dialog is accessed by double-clicking on the WEL package under a MODFLOW 6 simulation in the Project Explorer. It contains the following sections and options: | |||
*''Sections'' list – A list of sections that can be turned on or off: | |||
**''Comments'' – Turn on to make the ''Comments'' section visible. | |||
**''Options'' – Turn on to make the ''Options'' section visible. | |||
**''Data'' – Turn on to make the ''Data'' section visible. This section is on by default. | |||
*''Comments'' section – Enter general alphanumeric comments. Comments entered here get written at the top of the file, preceded by a '#' symbol. | |||
*''Options'' section – Temporal options and settings: | |||
**'''Auxiliary Variables...''' – Click to bring up the [[#Auxiliary Variables Dialog|''Auxiliary Variables'' dialog]]. | |||
**'''Time Series...''' – Click to bring up the [[#Time Series Files Dialog|''Time Series Files'' dialog]]. | |||
**'''Observations...''' – Click to bring up the [[#Observation Files Dialog|''Observation Files'' dialog]]. | |||
*''Options'' section – Temporal options and settings: | |||
**''BOUNDNAMES'' – If turned on, indicates that the list of multi-aquifer well cells will be provided with the associative boundary names. | |||
**''PRINT_INPUT'' – If turned on, indicates that the list of multi-aquifer well information will be written to the listing file after it is read. | |||
**''PRINT_HEAD'' – If turned on, indicates that well heads will be printed to the listing file for each stress period that "HEAD PRINT" is specified. | |||
**''PRINT_FLOWS'' – If turned on, indicates that a list of multi-aquifer well flow rates will be printed to the listing file. | |||
**''SAVE_FLOWS'' – If turned on, indicates that the multi-aquifer well flow terms will be written to a specified file. | |||
**''HEAD FILEOUT'' – The name of the output file to write stage information. | |||
**''BUDGET FILEOUT'' – Allows the specification of a file to which desired flow terms will be written. | |||
**''NO_WELL_STORAGE'' – If turned on, indicates that well storage will not be included in the continuity equation. It is used to control discharge rate oscillations. | |||
**''FLOWING_WELLS'' – If turned on, indicates that the flowing wells option is activated. | |||
**''SHUTDOWN_THETA'' – Defines the weight that is applied to the discharge rate for wells that have water limitations. | |||
**''SHUTDOWN_KAPPA'' – Defines the weight that is applied to the discharge rate for wells that have water limitations. It is used to control discharge rate oscillations. | |||
**''MOVER'' – When turned on, indicates that the Unsaturated Zone Flow (SFR) Package, in this instance can be used in collaboration with the Water Mover (MVR) Package. | |||
*''Data'' section – Contains the following: | |||
**''Periods'' drop-down – Use the '''Increment Up and Down''' [[File:Increment up and down arrows.png|14px]] buttons to select the desired period. | |||
**'''Define Period''' [[File:Add Note Icon.svg|14px]] – If no period is defined, click to make the spreadsheet editable. | |||
**'''Delete Period''' [[File:GMS Delete Icon.svg|14px]] – Click to delete the existing period. | |||
**'''Add Rows''' [[File:Row-add.svg|14px]] – Click to bring up the [[#Add Stresses Dialog|''Add Stresses'' dialog]]. | |||
**'''Delete Rows''' [[File:Row-delete.svg|14px]] – Click to bring up a dialog with three options: | |||
***'''Delete from All Periods''' – Click to delete matching stresses from all periods. | |||
***'''Delete from Just This Period''' – Click to delete matching stresses from just this period. | |||
**'''Plot All Periods''' [[File:Mf6time-series.svg|14px]] – Click to bring up the [[GMS:XY Series Editor|''XY Series Editor'' dialog]]. Requires that a cell be selected in the table. | |||
**'''Open Time Series''' [[File:Open Macro.svg|14px]] – Click to bring up the | |||
**'''Filter on Selected Cells''' [[File:Mf6filter.svg|14px]] – Click to turn on filtering on the selected cells. | |||
*''Table'' – Allows the manual input of different variables for the MAW Package. | |||
**'''WELLNO''' – A value that defines the reach number associated with the specified PERIOD data. | |||
**'''MAWSETTING''' – Information that is linked to keywords and values. | |||
**'''VALUE1''' – Value to be entered in relation to the specific project. | |||
**'''VALUE2''' – Value to be entered in relation to the specific project. | |||
**'''VALUE3''' – Value to be entered in relation to the specific project. | |||
{{-}} | {{-}} | ||
===MVR=== | |||
[[File: | ===Water Mover (MVR) Package=== | ||
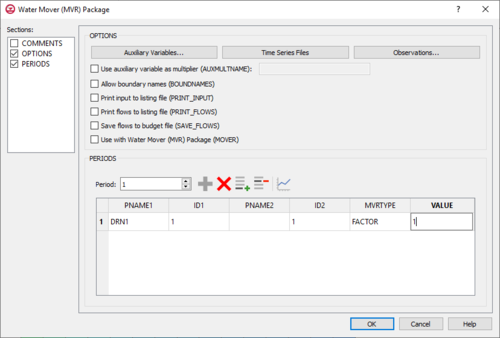
[[File:MF6-MVR package.png|thumb|500px|right|The ''Water Mover (MVR) Package'' dialog]] | |||
The ''Water Mover (MVR) Package'' dialog is accessed by double-clicking on the MVR package under a MODFLOW 6 simulation in the Project Explorer. It contains the following sections and options: | |||
*''Sections'' list – A list of sections that can be turned on or off: | |||
**''Comments'' – Turn on to make the ''Comments'' section visible. | |||
**''Options'' – Turn on to make the ''Options'' section visible. | |||
**''Periods'' – Turn on to make the ''Periods'' section visible. | |||
*''Comments'' section – Enter general alphanumeric comments. Comments entered here get written at the top of the file, preceded by a '#' symbol. | |||
*''Options'' section – Temporal options and settings: | |||
**'''Auxiliary Variables...''' – Click to bring up the [[#Auxiliary Variables Dialog|''Auxiliary Variables'' dialog]]. | |||
**'''Time Series...''' – Click to bring up the [[#Time Series Files Dialog|''Time Series Files'' dialog]]. | |||
**'''Observations...''' – Click to bring up the [[#Observation Files Dialog|''Observation Files'' dialog]]. | |||
**''Use auxiliary variable as multiplier (AUXMULTNAME)'' – Name of auxiliary variable to be used as multiplier o MVR conductance. | |||
**''Allow boundary names (BOUNDNAMES)'' – Turn on to allow boundary names to be included in the list of MVR cells. | |||
**''Print input to listing file (PRINT_INPUT)'' – Turn on to write the list of MVR information to the listing file immediately after it is read. | |||
**''Print flows to listing file (PRINT_FLOWS)'' – Turn on to write the list of MVR flow rates to the listing file for every stress period time step in which "BUDGET PRINT" is specified in [[GMS:MF6 OC Package|Output Control]]. | |||
**''Save flows to budget file (SAVE_FLOWS)'' – Turn on to write MVR flow terms to the file specified with "BUDGET FILEOUT" in [[GMS:MF6 OC Package|Output Control]]. | |||
**''Use with Water Mover (MVR) package (MOVER)'' – Turn on to allows this instance of the Water Mover Package to be used with the Water Mover (MVR) Package. | |||
*''Periods'' section – Contains the following: | |||
**''Period'' drop-down – Use the '''Increment Up and Down''' [[File:Increment up and down arrows.png|14px]] buttons to select the desired period. | |||
**'''Define Period''' [[File:Add Note Icon.svg|14px]] – If no period is defined, click to make the spreadsheet editable. | |||
**'''Delete Period''' [[File:GMS Delete Icon.svg|14px]] – Click to delete the existing period. | |||
**'''Add Rows''' [[File:Row-add.svg|14px]] – Click to bring up the GMS dialog and input values into the layer, row, column, and Q table found in the Periods section. | |||
**'''Delete Rows''' [[File:Row-delete.svg|14px]] – Click to bring up a dialog with three options: | |||
***'''Delete from All Periods''' – Click to delete matching stresses from all periods. | |||
***'''Delete from Just This Period''' – Click to delete matching stresses from just this period. | |||
**'''Plot All Periods''' [[File:Mf6time-series.svg|14px]] – Click to bring up the [[GMS:XY Series Editor|''XY Series Editor'' dialog]]. Requires that a cell be selected in the table. | |||
**'''Open Time Series''' [[File:Open Macro.svg|14px]] – Click to bring up the | |||
**'''Filter on Selected Cells''' [[File:Mf6filter.svg|14px]] – Click to turn on filtering on the selected cells. | |||
***Table – Options include: | |||
****''PNAME1'' – The name of a package that may be included in a subsequent stress period block. | |||
****''ID1'' – Identifies the provider. | |||
****''PNAME2'' – Represents the package name for the receiver. | |||
****''ID2'' – The identifier for the receiver. | |||
****''MVRTYPE'' – Is the character that represents the method for determining how much water will be moved. | |||
****''VALUE'' – Is used in an equation to determine how much water will be moved. | |||
{{-}} | {{-}} | ||
===OBS=== | |||
[[File: | ===Observations (OBS) Utility=== | ||
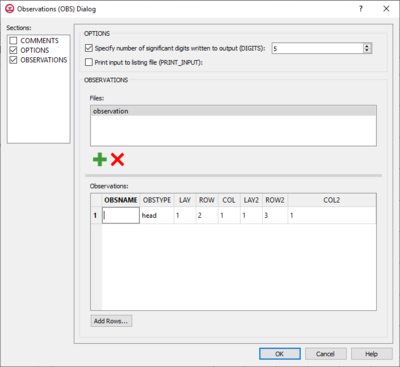
[[File:MF6-OBS dialog.png|thumb|400px|right|The ''Observations (OBS) Dialog'']] | |||
The ''Observations (OBS) Package'' dialog is accessed by double-clicking on the OBS package under a MODFLOW 6 simulation in the Project Explorer. It contains the following sections and options: | |||
*''Sections'' list – A list of sections that can be turned on or off: | |||
**''Comments'' – Turn on to make the ''Comments'' section visible. | |||
**''Options'' – Turn on to make the ''Options'' section visible. | |||
**''Observations'' – Turn on to make the ''Observations'' section visible. | |||
*''Options'' section contains the following: | |||
**''Specify number of significant digits written to output (DIGITS)'' – | |||
**''Print input to listing file (PRINT_INPUT)'' – Indicates that the list of information will be written to the listing file immediately after it is read. | |||
*''Observations'' section – Allows the entering of specific files into the given text box. | |||
**'''Add File''' [[File:Add Note Icon.svg|14px]] – Click to edit and add a file. | |||
**'''Delete File''' [[File:GMS Delete Icon.svg|14px]] – Click to delete the existing file. | |||
***Observations table: – Enables the entering of observation information when a new file has been added. | |||
****''OBSNAME'' – Name of the observation. | |||
****''OBSTYPE'' – Type of the observation file being used. | |||
****''LAY1'' – Identifier for the first layer. | |||
****''ROW1'' – Identifier for the first row. | |||
****''COL1'' – Identifier for the first column. | |||
****''LAY2'' – Identifier for the second layer. | |||
****''ROW2'' – Identifier for the second row. | |||
****''COL2'' – Identifier for the second column. | |||
***'''Add Rows...''' – Allows the inserting of additional rows into the Observations table. | |||
{{-}} | {{-}} | ||
===OC=== | |||
[[File: | ===Output Control (OC) Package=== | ||
[[File:MF6-OutputControl dialog.png|thumb|500px|right|The ''Output Control (OC) Dialog'']] | |||
The ''Output Control (OC) Package'' dialog is accessed by double-clicking on the OC package under a MODFLOW 6 simulation in the Project Explorer. It contains the following sections and options: | |||
*''Sections'' list – A list of sections that can be turned on or off: | |||
**''Comments'' – Turn on to make the ''Comments'' section visible. | |||
**''Options'' – Turn on to make the ''Options'' section visible. | |||
**''Periods'' – Turn on to make the ''Periods'' section visible. This section is on by default. | |||
*''Comments'' section – Enter general alphanumeric comments. Comments entered here get written at the top of the file, preceded by a '#' symbol. | |||
*''Options'' section contains the following: | |||
**''BUDGET FILEOUT:'' – Allows the specification of a file to which desired flow terms will be written. | |||
**''HEAD FILEOUT:'' – Output file to write head information. | |||
**''HEAD PRINT_FORMAT:'' – When turned on, allows you to specify the format to print to the listing file. Options include: | |||
***''GENERAL'' – Prints in the general format to the listing file | |||
***''EXPONENTIAL'' – Prints in exponential format to the listing file. | |||
***''FIXED'' – Prints in a fixed format to the listing file. | |||
***''SCIENTIFIC'' – Prints in a scientific format to the listing file. | |||
****''COLUMNS'' – The number of columns for writing data. | |||
****''WIDTH'' – The width used to write each number | |||
****''DIGITS'' – The number of digits used for writing each number. | |||
*''Periods'' section – Contains the following: | |||
**'''Add Rows''' [[File:Row-add.svg|14px]] – Click to bring up the GMS dialog and input values into the layer, row, column, and Q table found in the Periods section. | |||
**''Preset output'' – Allows choosing which time periods you wish to output information. Options include: | |||
***''At every time step'' – Output information at every time step. | |||
***''At last time step of each stress period'' – Output information at the last time step of each stress period. | |||
***''User specified'' – Allows user to choose the output settings manually which are entered into a given table. | |||
****''Table'' – Contains the following options: | |||
*****'''PERIOD''' – Indicates for which PERIOD the information will be saved. | |||
*****'''PRINT/SAVE''' – Indicates which stress period the information will be printed or saved on. | |||
*****'''RTYPE''' – This is the type of information (BUDGET/HEAD) to save or print. | |||
*****'''OCSETTING''' – Indicates which steps the data will be saved for. | |||
*****'''FREQUENCY/STEPS''' – Indicates which time step frequency or STEPS for which information will be saved. | |||
{{-}} | {{-}} | ||
===RCH=== | |||
[[File: | ===Recharge (RCH) Package=== | ||
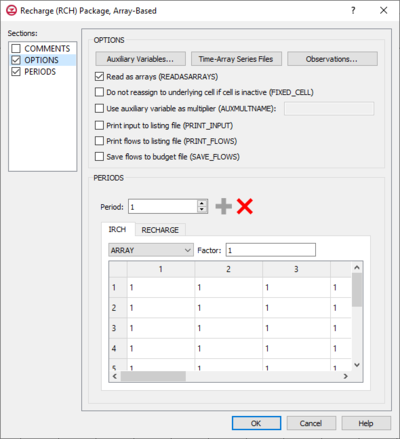
[[File:MF6-RCH package1.png|thumb|400px|right|The ''Recharge (RCH) Package'' dialog with the ''IRCH'' tab active]] | |||
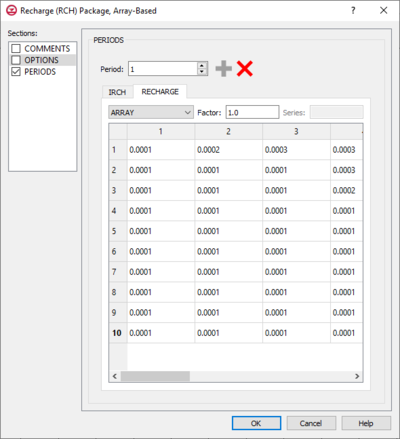
[[File:MF6-RCH package2.png|thumb|400px|right|The ''Recharge (RCH) Package'' dialog with the ''RECHARGE'' tab active]] | |||
The ''Recharge (RCH) Package'' dialog is accessed by double-clicking on the RCH package under a MODFLOW 6 simulation in the Project Explorer. It contains the following sections and options: | |||
*''Sections'' list – A list of sections that can be turned on or off: | |||
**''Comments'' – Turn on to make the ''Comments'' section visible. | |||
**''Options'' – Turn on to make the ''Options'' section visible. | |||
**''Periods'' – Turn on to make the ''Periods'' section visible. This section is on by default. | |||
*''Comments'' section – Enter general alphanumeric comments. Comments entered here get written at the top of the file, preceded by a '#' symbol. | |||
*''Options'' section – Temporal options and settings: | |||
**'''Auxiliary Variables...''' – Click to bring up the [[#Auxiliary Variables Dialog|''Auxiliary Variables'' dialog]]. | |||
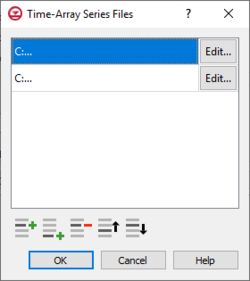
**'''Time-Array Series Files''' – Click to bring up the [[#Time-Array Series Files Dialog|''Time-Array Series Files'' dialog]]. | |||
**'''Observations...''' – Click to bring up the [[#Observation Files Dialog|''Observation Files'' dialog]]. | |||
**''Read as arrays (READASARRAYS) – Click to specify to use array-based input in the RCH package. | |||
**''Do not reassign to underlying cell if cell is inactive (FIXED_CELL)'' – Click to indicate that recharge will not be reassigned to a cell underlying the cell specified in the list if the specified cell is inactive. | |||
**''Use auxiliary variable as multiplier (AUXMULTNAME)'' – Name of auxiliary variable to be used as multiplier of recharge. | |||
**''Print input to listing file (PRINT_INPUT)'' – Turn on to write the list of recharge information to the listing file immediately after it is read. | |||
**''Print flows to listing file (PRINT_FLOWS)'' – Turn on to write the list of recharge flow rates to the listing file for every stress period time step in which "BUDGET PRINT" is specified in [[GMS:MF6 OC Package|Output Control]]. | |||
**''Save flows to budget file (SAVE_FLOWS)'' – Turn on to write recharge flow terms to the file specified with "BUDGET FILEOUT" in [[GMS:MF6 OC Package|Output Control]]. | |||
*''Periods'' section – Contains the following: | |||
**''Period'' drop-down – Use the '''Increment Up and Down''' [[File:Increment up and down arrows.png|14px]] buttons to select the desired period. | |||
**'''Define Period''' [[File:Add Note Icon.svg|14px]] – If no period is defined, click to make the spreadsheet editable. | |||
**'''Delete Period''' [[File:GMS Delete Icon.svg|14px]] – Click to delete the existing period. | |||
*''Table'' – Contains two tabs: | |||
**'''IRCH''' – The layer number that defines the layer in the column where recharge is applied and can only be applied if ''READASARRAYS'' is on in the ''OPTIONS'' section. | |||
***''UNDEFINED'' – Indicates that there are no definite variables to be applied. | |||
***''CONSTANT'' – If "Constant" is selected from the drop-down, enter a decimal value in the ''Constant'' field to be applied to all cells in the layer(s). | |||
***''ARRAY'' – If "Array" is selected from the drop-down, enter an integer in the ''factor:'' field to be multiplied to the array after it is read. | |||
***''TIME_ARRAY SERIES'' – Is not supported for '''IRCH'''. | |||
**'''RECHARGE''' – The recharge flux rate. | |||
***''UNDEFINED'' – Indicates that there are no definite variable to be applied. | |||
***''CONSTANT'' – If "Constant" is selected from the drop-down, enter a decimal value in the ''Constant'' field to be applied to all cells in the layer(s). | |||
***''ARRAY'' – If "Array" is selected from the drop-down, enter an integer in the ''factor:'' field to be multiplied to the array after it is read. | |||
***''TIME_ARRAY SERIES'' – If "Time-Array Series" is selected from the drop-down, indicate which Time-Array Series is being applied in the ''Series:'' field. | |||
{{-}} | {{-}} | ||
===RIV=== | |||
===River (RIV) Package=== | |||
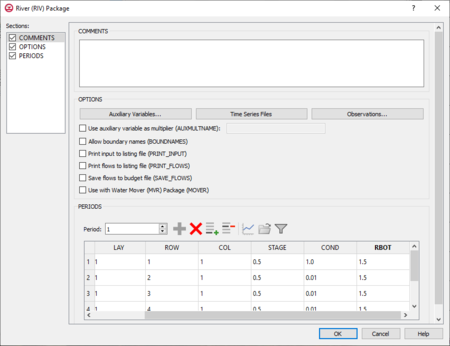
[[File:MF6-RIV package.png|thumb|450px|right|The ''River (RIV) Package'' dialog]] | [[File:MF6-RIV package.png|thumb|450px|right|The ''River (RIV) Package'' dialog]] | ||
The ''River (RIV) Package'' dialog is accessed by double-clicking on the WEL package under a MODFLOW 6 simulation in the Project Explorer. It contains the following sections and options: | |||
*''Sections'' list – A list of sections that can be turned on or off: | |||
**''Comments'' – Turn on to make the ''Comments'' section visible. | |||
**''Options'' – Turn on to make the ''Options'' section visible. | |||
**''Periods'' – Turn on to make the ''Periods'' section visible. | |||
*''Comments'' section – Enter general alphanumeric comments. Comments entered here get written at the top of the file, preceded by a '#' symbol. | |||
*''Options'' section – Temporal options and settings: | |||
**'''Auxiliary Variables...''' – Click to bring up the [[#Auxiliary Variables Dialog|''Auxiliary Variables'' dialog]]. | |||
**'''Time Series...''' – Click to bring up the [[#Time Series Files Dialog|''Time Series Files'' dialog]]. | |||
**'''Observations...''' – Click to bring up the [[#Observation Files Dialog|''Observation Files'' dialog]]. | |||
**''Use auxiliary variable as multiplier (AUXMULTNAME)'' – Name of auxiliary variable to be used as multiplier of riverbed conductance. | |||
**''Allow boundary names (BOUNDNAMES)'' – Turn on to allow boundary names to be included in the list of river cells. | |||
**''Print input to listing file (PRINT_INPUT)'' – Turn on to write the list of river information to the listing file immediately after it is read. | |||
**''Print flows to listing file (PRINT_FLOWS)'' – Turn on to write the list of river flow rates to the listing file for every stress period time step in which "BUDGET PRINT" is specified in [[GMS:MF6 OC Package|Output Control]]. | |||
**''Save flows to budget file (SAVE_FLOWS)'' – Turn on to write river flow terms to the file specified with "BUDGET FILEOUT" in [[GMS:MF6 OC Package|Output Control]]. | |||
**''Use with Water Mover (MVR) package (MOVER)'' – Turn on to allows this instance of the River Package to be used with the Water Mover (MVR) Package. | |||
*''Periods'' section – Contains the following: | |||
**''Period'' drop-down – Use the '''Increment Up and Down''' [[File:Increment up and down arrows.png|14px]] buttons to select the desired period. | |||
**'''Define Period''' [[File:Add Note Icon.svg|14px]] – If no period is defined, click to make the spreadsheet editable. | |||
**'''Delete Period''' [[File:GMS Delete Icon.svg|14px]] – Click to delete the existing period. | |||
**'''Add Rows''' [[File:Row-add.svg|14px]] – Click to bring up the GMS dialog and input values into the layer, row, column, and Q table found in the Periods section. | |||
**'''Delete Rows''' [[File:Row-delete.svg|14px]] – Click to bring up a dialog with three options: | |||
***'''Delete from All Periods''' – Click to delete matching stresses from all periods. | |||
***'''Delete from Just This Period''' – Click to delete matching stresses from just this period. | |||
**'''Plot All Periods''' [[File:Mf6time-series.svg|14px]] – Click to bring up the [[GMS:XY Series Editor|''XY Series Editor'' dialog]]. Requires that a cell be selected in the table. | |||
**'''Open Time Series''' [[File:Open Macro.svg|14px]] – Click to bring up the | |||
**'''Filter on Selected Cells''' [[File:Mf6filter.svg|14px]] – Click to turn on filtering on the selected cells. | |||
*''Table'' – Options include: | |||
**'''LAY''' – Represents which layer within the module to which the chosen well will be assigned. | |||
**'''ROW''' – Represents which row within the module to which the chosen well will be assigned. | |||
**'''COL''' – Represents which column within the module to which the chosen well will be assigned. | |||
**'''STAGE''' – Variable that represents the head in the river. | |||
**'''COND''' – Variable that represents the riverbed hydraulic conductance. | |||
**'''RBOT''' – Variable that represents the elevation of the bottom of the riverbed. | |||
{{-}} | {{-}} | ||
===SFR=== | ===Streamflow Routing (SFR) Package=== | ||
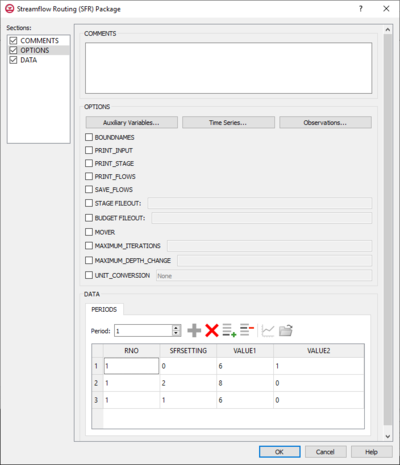
[[File:MF6-SFR package.png|thumb|400px|right|The ''Streamflow Routing (SFR) Package'' dialog]] | [[File:MF6-SFR package.png|thumb|400px|right|The ''Streamflow Routing (SFR) Package'' dialog]] | ||
The ''Streamflow Routing (SFR) Package'' dialog is accessed by double-clicking on the SFR package under a MODFLOW 6 simulation in the Project Explorer. It contains the following sections and options: | |||
*''Sections'' list – A list of sections that can be turned on or off: | |||
**''Comments'' – Turn on to make the ''Comments'' section visible. | |||
**''Options'' – Turn on to make the ''Options'' section visible. | |||
**''Data'' – Turn on to make the ''Data'' section visible. This section is on by default. | |||
*''Comments'' section – Enter general alphanumeric comments. Comments entered here get written at the top of the file, preceded by a '#' symbol. | |||
*''Options'' section – Temporal options and settings: | |||
**'''Auxiliary Variables...''' – Click to bring up the [[#Auxiliary Variables Dialog|''Auxiliary Variables'' dialog]]. | |||
**'''Time Series...''' – Click to bring up the [[#Time Series Files Dialog|''Time Series Files'' dialog]]. | |||
**'''Observations...''' – Click to bring up the [[#Observation Files Dialog|''Observation Files'' dialog]]. | |||
*''Options'' section – Temporal options and settings: | |||
**''BOUNDNAMES'' – If turned on, indicates that the list of streamflow routing cells will be provided with the associative boundary names. | |||
**''PRINT_INPUT'' – If turned on, indicates that the list of streamflow routing information will be written to the listing file after it is read. | |||
**''PRINT_FLOWS'' – If turned on, indicates that a list of streamflow routing flow rates will be printed to the listing file. | |||
**''SAVE_FLOWS'' – If turned on, indicates that the streamflow routing flow terms will be written to a specified file. | |||
**''STAGE FILEOUT'' – Indicates that the record corresponds to a specific stage. Also allows the written indication of stage information. | |||
**''BUDGET FILEOUT'' – Allows the specification of a file to which desired flow terms will be written. | |||
**''MOVER'' – When turned on, indicates that the Streamflow Routing (SFR) Package, in this instance can be used in collaboration with the Water Mover (MVR) Package. | |||
**''MAXIMUM_ITERATIONS'' – Allows the written indication of the maximum number of Streamflow Routing NewtonRaphson iterations allowed for a reach. | |||
**''MAXIMUM_DEPTH_CHANGE'' – Allows the written indication of the depth closure tolerance. | |||
**''UNIT_CONVERSION'' – A conversion factor that is used in calculating stream depth. | |||
*''Data'' section – Contains the following: | |||
**''Periods'' drop-down – Use the '''Increment Up and Down''' [[File:Increment up and down arrows.png|14px]] buttons to select the desired period. | |||
**'''Define Period''' [[File:Add Note Icon.svg|14px]] – If no period is defined, click to make the spreadsheet editable. | |||
**'''Delete Period''' [[File:GMS Delete Icon.svg|14px]] – Click to delete the existing period. | |||
**'''Add Rows''' [[File:Row-add.svg|14px]] – Click to bring up the [[#Add Stresses Dialog|''Add Stresses'' dialog]]. | |||
**'''Delete Rows''' [[File:Row-delete.svg|14px]] – Click to bring up a dialog with three options: | |||
***'''Delete from All Periods''' – Click to delete matching stresses from all periods. | |||
***'''Delete from Just This Period''' – Click to delete matching stresses from just this period. | |||
**'''Plot All Periods''' [[File:Mf6time-series.svg|14px]] – Click to bring up the [[GMS:XY Series Editor|''XY Series Editor'' dialog]]. Requires that a cell be selected in the table. | |||
**'''Open Time Series''' [[File:Open Macro.svg|14px]] – Click to bring up the | |||
**'''Filter on Selected Cells''' [[File:Mf6filter.svg|14px]] – Click to turn on filtering on the selected cells. | |||
*''Table'' – Allows the manual input of different variables for the SFR Package. | |||
**'''RNO''' – A value that defines the reach number associated with the specified PERIOD data. | |||
**'''SFRSETTING''' – Information that is linked to keywords and values. | |||
**'''VALUE1''' – Value to be entered in relation to the specific project. | |||
**'''VALUE2''' – Value to be entered in relation to the specific project. | |||
{{-}} | {{-}} | ||
===STO=== | ===Storage (STO) Package=== | ||
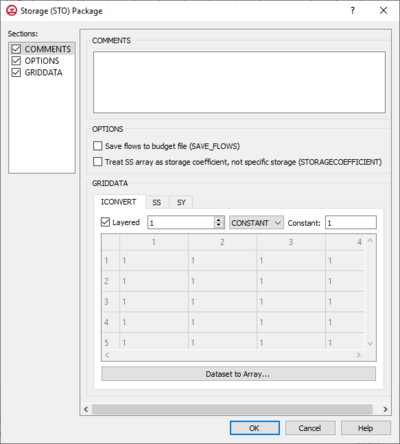
[[File: | [[File:MF6-Storage package.png|thumb|400px|right|The ''Storage (STO) Package'' dialog]] | ||
The ''Storage (STO) Package'' dialog is accessed by double-clicking on the STO package under a MODFLOW 6 simulation in the Project Explorer. It contains the following sections and options: | |||
*''Sections'' list – A list of sections that can be turned on or off: | |||
**''Comments'' – Turn on to make the ''Comments'' section visible. | |||
**''Options'' – Turn on to make the ''Options'' section visible. | |||
**''GridData'' – Turn on to make the ''GridData'' section visible. This section is on by default. | |||
*''Comments'' section – Enter general alphanumeric comments. Comments entered here get written at the top of the file, preceded by a '#' symbol. | |||
*''Options'' section – Contains the following: | |||
**''Save flows to budget file (SAVE_FLOWS)'' – Turn on to write cell-by-cell flow terms to the file specified with "BUDGET SAVE FILE" in [[GMS:MF6 OC Package|Output Control]]. | |||
**''Treat SS array as storage coefficient, not specific storage (STORAGECOEFFICIENT)'' – Indicates that the SS array is read as storage coefficient and not as specific storage. | |||
*''GridData'' section – Contains a number of tabs, including: | |||
**''ICONVERT'' – Helps specify whether or not a cell is convertible for the storage calculation. | |||
**''SS'' – Represents specific storage. | |||
**''SY'' – Represents the specific field. | |||
***''Layered'' – When this is turned on, through use of the increment up and down buttons, it helps indicate the layers in which confined and unconfined storage is used (if "Array" is selected from the drop-down). | |||
***''Array'' &ndah; If "Array" is selected from the drop-down, enter an integer in the ''factor:'' field to be multiplied to the array after it is read. | |||
***''Constant'' – If "Constant" is selected from the drop-down, enter a decimal value in the ''Constant'' field to be applied to all cells in the layer(s). | |||
**''Dataset to Array...'' – Allows you to select the data set to apply. | |||
{{-}} | {{-}} | ||
===UZF=== | |||
===Unsaturated Zone Flow (UZF) Package=== | |||
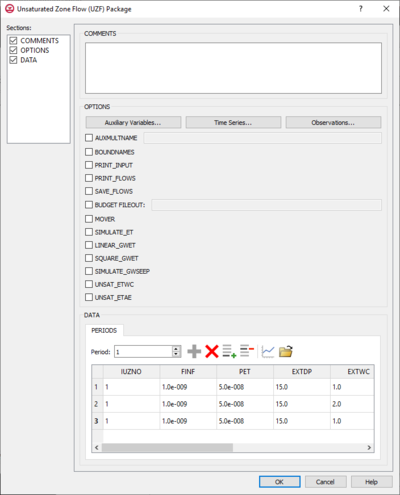
[[File:MF6-UZF package.png|thumb|400px|right|The ''Unsaturated Zone Flow (UZF)'' dialog]] | [[File:MF6-UZF package.png|thumb|400px|right|The ''Unsaturated Zone Flow (UZF)'' dialog]] | ||
The ''Unsaturated Zone Flow (UZF) Package'' dialog is accessed by double-clicking on the WEL package under a MODFLOW 6 simulation in the Project Explorer. It contains the following sections and options: | |||
*''Sections'' list – A list of sections that can be turned on or off: | *''Sections'' list – A list of sections that can be turned on or off: | ||
**''Comments'' – Turn on to make the ''Comments'' section visible. | **''Comments'' – Turn on to make the ''Comments'' section visible. | ||
| Line 327: | Line 744: | ||
**''Data'' – Turn on to make the ''Data'' section visible. This section is on by default. | **''Data'' – Turn on to make the ''Data'' section visible. This section is on by default. | ||
*''Comments'' section – Enter general alphanumeric comments. Comments entered here get written at the top of the file, preceded by a '#' symbol. | *''Comments'' section – Enter general alphanumeric comments. Comments entered here get written at the top of the file, preceded by a '#' symbol. | ||
*''Options'' section | *''Options'' section – Temporal options and settings: | ||
**'''Auxiliary Variables...''' – Click to bring up the [[#Auxiliary Variables Dialog|''Auxiliary Variables'' dialog]]. | **'''Auxiliary Variables...''' – Click to bring up the [[#Auxiliary Variables Dialog|''Auxiliary Variables'' dialog]]. | ||
**'''Time Series...''' – Click to bring up the [[#Time Series Files Dialog|''Time Series Files'' dialog]]. | **'''Time Series...''' – Click to bring up the [[#Time Series Files Dialog|''Time Series Files'' dialog]]. | ||
**'''Observations...''' – Click to bring up the [[#Observation Files Dialog|''Observation Files'' dialog]]. | **'''Observations...''' – Click to bring up the [[#Observation Files Dialog|''Observation Files'' dialog]]. | ||
**''AUXMULTNAME'' – The name of the auxiliary variable. | **''AUXMULTNAME'' – The name of the auxiliary variable. | ||
**''BOUNDNAMES'' – If turned on, indicates that the list of | **''BOUNDNAMES'' – If turned on, indicates that the list of UZF cells will be provided with the associative boundary names. | ||
**''PRINT_INPUT'' – If turned on, indicates that the list of | **''PRINT_INPUT'' – If turned on, indicates that the list of UZF information will be written to the listing file after it is read. | ||
**''PRINT_FLOWS'' – If turned on, indicates that a list of | **''PRINT_FLOWS'' – If turned on, indicates that a list of UZF flow rates will be printed to the listing file. | ||
**''SAVE_FLOWS'' – If turned on, indicates that the | **''SAVE_FLOWS'' – If turned on, indicates that the UZF flow terms will be written to a specified file. | ||
**''BUDGET FILEOUT'' – Allows the specification of a file to which desired flow terms will be written. | **''BUDGET FILEOUT'' – Allows the specification of a file to which desired flow terms will be written. | ||
**''MOVER'' – When turned on, indicates that the Unsaturated Zone Flow (UZF) Package, in this instance can be used in collaboration with the Water Mover (MVR) Package. | **''MOVER'' – When turned on, indicates that the Unsaturated Zone Flow (UZF) Package, in this instance can be used in collaboration with the Water Mover (MVR) Package. | ||
| Line 348: | Line 765: | ||
**'''Define Period''' [[File:Add Note Icon.svg|14px]] – If no period is defined, click to make the spreadsheet editable. | **'''Define Period''' [[File:Add Note Icon.svg|14px]] – If no period is defined, click to make the spreadsheet editable. | ||
**'''Delete Period''' [[File:GMS Delete Icon.svg|14px]] – Click to delete the existing period. | **'''Delete Period''' [[File:GMS Delete Icon.svg|14px]] – Click to delete the existing period. | ||
**'''Add Rows''' [[File: | **'''Add Rows''' [[File:Row-add.svg|14px]] – Click to bring up the [[#Add Stresses Dialog|''Add Stresses'' dialog]]. | ||
**'''Delete Rows''' [[File: | **'''Delete Rows''' [[File:Row-delete.svg|14px]] – Click to bring up a dialog with three options: | ||
***'''Delete from All Periods''' – Click to delete matching stresses from all periods. | ***'''Delete from All Periods''' – Click to delete matching stresses from all periods. | ||
***'''Delete from Just This Period''' – Click to delete matching stresses from just this period. | ***'''Delete from Just This Period''' – Click to delete matching stresses from just this period. | ||
**'''Plot All Periods''' [[File:Mf6time-series.svg|14px]] – Click to bring up the [[GMS:XY Series Editor|''XY Series Editor'' dialog]]. Requires that a cell be selected in the table. | |||
**'''Plot All Periods''' [[File: | |||
**'''Open Time Series''' [[File:Open Macro.svg|14px]] – Click to bring up the | **'''Open Time Series''' [[File:Open Macro.svg|14px]] – Click to bring up the | ||
**'''Filter on Selected Cells''' [[File: | **'''Filter on Selected Cells''' [[File:Mf6filter.svg|14px]] – Click to turn on filtering on the selected cells. | ||
*''Table'' – Allows the manual input of different variables for the UZF Package. | *''Table'' – Allows the manual input of different variables for the UZF Package. | ||
**'''IUZNO''' – | **'''IUZNO''' – An integer value that defines the UZF cell number associated with the specified PERIOD data on the line. | ||
**'''FINF''' – | **'''FINF''' – A value that defines the applied infiltration rate of the UZF cell. | ||
**'''PET''' – | **'''PET''' – A value that defines the ET rate of the UZF cell and specified GWF cell. | ||
**'''EXDP''' – | **'''EXDP''' – A value that defines the ET extinction depth of the UZF cell. | ||
**'''EXTWC''' – | **'''EXTWC''' – A value that defines the amount of water removed from the UZF cell through evapotranspiration. | ||
**'''HA''' – | **'''HA''' – A value that defines the amount of potential air that enters the UZF cell. | ||
**'''HROOT''' – | **'''HROOT''' – A value that defines the root potential of the UZF cell. | ||
**'''ROOTACT''' – | **'''ROOTACT''' – A value that defines how much root activity exists in the UZF cell. | ||
{{-}} | {{-}} | ||
===WEL=== | ===Well (WEL) Package=== | ||
[[File:MF6-WellsPackageDialog.png|thumb|400px|right|The ''Well (WEL) Package'' dialog]] | [[File:MF6-WellsPackageDialog.png|thumb|400px|right|The ''Well (WEL) Package'' dialog]] | ||
The ''Well (WEL) Package'' dialog is accessed by double-clicking on the WEL package under a MODFLOW 6 simulation in the Project Explorer. It contains the following sections and options: | The ''Well (WEL) Package'' dialog is accessed by double-clicking on the WEL package under a MODFLOW 6 simulation in the Project Explorer. It contains the following sections and options: | ||
| Line 380: | Line 796: | ||
**'''Time Series...''' – Click to bring up the [[#Time Series Files Dialog|''Time Series Files'' dialog]]. | **'''Time Series...''' – Click to bring up the [[#Time Series Files Dialog|''Time Series Files'' dialog]]. | ||
**'''Observations...''' – Click to bring up the [[#Observation Files Dialog|''Observation Files'' dialog]]. | **'''Observations...''' – Click to bring up the [[#Observation Files Dialog|''Observation Files'' dialog]]. | ||
**''Use auxiliary variable as multiplier (AUXMULTNAME)'' – Name of auxiliary variable to be used as multiplier of | **''Use auxiliary variable as multiplier (AUXMULTNAME)'' – Name of auxiliary variable to be used as multiplier of well flow rate. | ||
**''Allow boundary names (BOUNDNAMES)'' – Turn on to allow boundary names to be included in the list of | **''Allow boundary names (BOUNDNAMES)'' – Turn on to allow boundary names to be included in the list of well cells. | ||
**''Print input to listing file (PRINT_INPUT)'' – Turn on to write the list of | **''Print input to listing file (PRINT_INPUT)'' – Turn on to write the list of well information to the listing file immediately after it is read. | ||
**''Print flows to listing file (PRINT_FLOWS)'' – Turn on to write the list of | **''Print flows to listing file (PRINT_FLOWS)'' – Turn on to write the list of well flow rates to the listing file for every stress period time step in which "BUDGET PRINT" is specified in [[GMS:MF6 OC Package|Output Control]]. | ||
**''Save flows to budget file (SAVE_FLOWS)'' – Turn on to write | **''Save flows to budget file (SAVE_FLOWS)'' – Turn on to write well flow terms to the file specified with "BUDGET FILEOUT" in [[GMS:MF6 OC Package|Output Control]]. | ||
**''Use with Water Mover (MVR) package (MOVER)'' – Turn on to allows this instance of the | **''Use with Water Mover (MVR) package (MOVER)'' – Turn on to allows this instance of the Well Package to be used with the Water Mover (MVR) Package. | ||
*''Periods'' section – Contains the following: | *''Periods'' section – Contains the following: | ||
**''Period'' drop-down – Use the '''Increment Up and Down''' [[File:Increment up and down arrows.png|14px]] buttons to select the desired period. | **''Period'' drop-down – Use the '''Increment Up and Down''' [[File:Increment up and down arrows.png|14px]] buttons to select the desired period. | ||
**'''Define Period''' [[File:Add Note Icon.svg|14px]] – If no period is defined, click to make the spreadsheet editable. | **'''Define Period''' [[File:Add Note Icon.svg|14px]] – If no period is defined, click to make the spreadsheet editable. | ||
**'''Delete Period''' [[File:GMS Delete Icon.svg|14px]] – Click to delete the existing period. | **'''Delete Period''' [[File:GMS Delete Icon.svg|14px]] – Click to delete the existing period. | ||
**'''Add Rows''' [[File: | **'''Add Rows''' [[File:Row-add.svg|14px]] – Click to bring up the GMS dialog and input values into the layer, row, column, and Q table found in the Periods section. | ||
**'''Delete Rows''' [[File: | **'''Delete Rows''' [[File:Row-delete.svg|14px]] – Click to bring up a dialog with three options: | ||
***'''Delete from All Periods''' – Click to delete matching stresses from all periods. | ***'''Delete from All Periods''' – Click to delete matching stresses from all periods. | ||
***'''Delete from Just This Period''' – Click to delete matching stresses from just this period. | ***'''Delete from Just This Period''' – Click to delete matching stresses from just this period. | ||
**'''Plot All Periods''' [[File:Mf6time-series.svg|14px]] – Click to bring up the [[GMS:XY Series Editor|''XY Series Editor'' dialog]]. Requires that a cell be selected in the table. | |||
**'''Plot All Periods''' [[File: | |||
**'''Open Time Series''' [[File:Open Macro.svg|14px]] – Click to bring up the | **'''Open Time Series''' [[File:Open Macro.svg|14px]] – Click to bring up the | ||
**'''Filter on Selected Cells''' [[File: | **'''Filter on Selected Cells''' [[File:Mf6filter.svg|14px]] – Click to turn on filtering on the selected cells. | ||
*''Table'' – Allows the manual input of the placement and rate of any wells placed within the module. | *''Table'' – Allows the manual input of the placement and rate of any wells placed within the module. | ||
**'''LAY''' – Represents which layer within the | **'''LAY''' – Represents which layer within the grid to which the chosen well will be assigned. | ||
**'''ROW''' – Represents which row within the | **'''ROW''' – Represents which row within the grid to which the chosen well will be assigned. | ||
**'''COL''' – Represents which column within the | **'''COL''' – Represents which column within the grid to which the chosen well will be assigned. | ||
**'''Q''' – Represents the volumetric well rate at which the recharge (positive value) and discharge (negative value) of the well will be. | **'''Q''' – Represents the volumetric well rate at which the recharge (positive value) and discharge (negative value) of the well will be. | ||
| Line 408: | Line 823: | ||
===ZONE FILE=== | ===ZONE FILE=== | ||
[[File: | [[File:MF6-ZonePackage.png|thumb|400px|right|The ''Zone File'' dialog]] | ||
The ''ZONE FILE'' dialog is accessed by double-clicking on the ZONE FILE package under a MODFLOW 6 simulation in the Project Explorer. It contains the following sections and options: | |||
**''Comments'' – Turn on to make the ''Comments'' section visible. | |||
**''GridData'' – Turn on to make the ''GridData'' section visible. This section is on by default. | |||
*''Comments'' section – Enter general alphanumeric comments. Comments entered here get written at the top of the file, preceded by a '#' symbol. | |||
*''GridData'' section – Contains one tab (IZONE): | |||
***''Layered'' – Provides an array for each layer of the grid. | |||
***If "Constant" is selected from the drop-down, enter a decimal value in the ''Constant'' field to be applied to all cells in the top model layer. | |||
***If "Array" is selected from the drop-down, a user-editable array appears below the drop-down. Enter a decimal ''Factor'' value to the right of the drop-down. The individual elements of the array are multiplied by the factor value after they are read. | |||
***'''Dataset to Array...''' – Click to open the ''Select Dataset'' dialog. Select the desired database(s) in this dialog. | |||
{{-}} | {{-}} | ||
==Groundwater Flow (GWF) Model Name File== | |||
[[File:MF6-GWF Model.png|thumb|400px|right|The ''Groundwater Flow (GWF) Model Name File'' dialog]] | |||
The ''Groundwater Flow (GWF) Model Name File'' dialog is accessed by double-clicking on the GWF_Model under a MODFLOW 6 simulation in the Project Explorer. It contains the following sections and options: | |||
*''Sections'' list – A list of sections that can be turned on or off: | |||
**''Comments'' – Turn on to make the ''Comments'' section visible. | |||
**''Options'' – Turn on to make the ''Options'' section visible. | |||
**''Packages'' – Turn on to make the ''Packages'' section visible. | |||
*''Comments'' section – Enter general alphanumeric comments. Comments entered here get written at the top of the file, preceded by a '#' symbol. | |||
*''Options'' section – Temporal options and settings: | |||
**''Output listing file (LIST)'' – When turned on, indicates which file is in the output listing file. | |||
**''Print all model package input to listing file (PRINT_INPUT)'' – Turn on to write the list of information to the listing file immediately after it is read. | |||
**''Save model package flows to budget file (SAVE_FLOWS)'' – Turn on to write flow terms to the file specified with "BUDGET FILEOUT" in [[GMS:MF6 OC Package|Output Control]]. | |||
**''Activate Newton-Raphson formulation for groundwater flow (NEWTON)'' – When turned on, this selection allows the utilization of the Newton-Raphson formulation as opposed to the standard used in most previous MODFLOW versions. | |||
**''Under-relax computed heads that are below cell bottom elevations (UNDER_RELAXATION)'' – When turned on, it helps define the nonlinear under-relaxation schemes used. | |||
*''Packages'' – Allows the indication of specific file and project details for the model package. | |||
**ftype – Represents the file type. | |||
**fname – Represents the file name. | |||
**pname – Represents the package's name and cannot be altered in this dialog. | |||
{{-}} | |||
==Source/Sink Dialog== | |||
[[File:MF6-Source-Sink Dialog.png|thumb|400px|right|The ''Source/Sink Dialog'']] | |||
The ''Source/Sink Dialog'' is accessed by selecting a cell, right-clicking and choosing the option ''MODFLOW 6 GWF_Model- Cell Properties...'' in the right-click menu provided. | |||
*''Packages:'' section – Provides a list of active packages within the module to choose and select depending on desired outcome. | |||
*''Periods'' section – Contains the following: | |||
**''Period'' drop-down – Use the '''Increment Up and Down''' [[File:Increment up and down arrows.png|14px]] buttons to select the desired period. | |||
**'''Define Period''' [[File:Add Note Icon.svg|14px]] – If no period is defined, click to make the spreadsheet editable. | |||
**'''Delete Period''' [[File:GMS Delete Icon.svg|14px]] – Click to delete the existing period. | |||
**'''Add Rows''' [[File:Row-add.svg|14px]] – Click to bring up the [[#Add Stresses Dialog|''Add Stresses'' dialog]]. | |||
**'''Delete Rows''' [[File:Row-delete.svg|14px]] – Click to bring up a dialog with three options: | |||
***'''Delete from All Periods''' – Click to delete matching stresses from all periods. | |||
***'''Delete from Just This Period''' – Click to delete matching stresses from just this period. | |||
**'''Plot All Periods''' [[File:Mf6time-series.svg|14px]] – Click to bring up the [[GMS:XY Series Editor|''XY Series Editor'' dialog]]. Requires that a cell be selected in the table. | |||
**'''Open Time Series''' [[File:Open Macro.svg|14px]] – Only available if a time series has previously been defined, and the time series is specifically called in the ''Head'' column. For example, if a time series named "ts_1" is defined, enter "ts_1" in the Head column of the appropriate row. Click to bring up the | |||
**'''Filter on Selected Cells''' [[File:Mf6filter.svg|14px]] – Click to turn on filtering on the selected cells. | |||
Table – Contains different information depending on the package chosen in the ''Packages:'' section. Options are as follows: | |||
{| Class="wikitable" | |||
! Package | |||
! Table | |||
|- | |||
| CHD || ''LAY'' – Used to specify certain layers of the module. | |||
''ROW'' – Used to specify certain rows. | |||
''COL'' – Used to specify certain columns. | |||
''HEAD'' – Represents the head at the boundary. | |||
|- | |||
| DRN || ''LAY'' – Used to specify which layer is being applied. | |||
''ROW'' – Used to specify which row is being applied. | |||
''COL'' – Used to specify which column is being applied. | |||
''ELEV'' – Represents the elevation of the drain. | |||
''COND'' – Represents the hydraulic conductance between the aquifer and the drain. | |||
|- | |||
| GHB || ''LAY'' – Used to specify certain layers of the module. | |||
''ROW'' – Used to specify which row is being applied. | |||
''COL'' – Used to specify which column is being applied. | |||
''BHEAD'' – Represents the boundary head. | |||
''COND'' – Represents the hydraulic conductance between the aquifer cell and the boundary. | |||
|- | |||
| HFB || ''LAY1'' – Represents the first of two chosen layers. | |||
''ROW1'' – Represents the first of two chosen rows. | |||
''COL1'' – Represents the first of two chosen columns. | |||
''LAY2'' – Represents the second of two chosen layers. | |||
''ROW2'' – Represents the second of two chosen rows. | |||
''COL2'' – Represents the second of two chosen columns. | |||
''HYDCHR'' – The hydraulic characteristic of the horizontal-flow barrier. When this variable is negative it multiplied by the conductance of two cells. | |||
|- | |||
| LAK || ''LAKENO_OUTLETNO'' – A value that defines the reach number associated with the specified PERIOD data. | |||
''SETTING'' – Information that is linked to keywords and values. | |||
''VALUE1'' – Value to be entered in relation to the specific project. | |||
''VALUE2'' – Value to be entered in relation to the specific project. | |||
|- | |||
| MAW || ''WELLNO'' – A value that defines the reach number associated with the specified PERIOD data. | |||
''MAWSETTING'' – Information that is linked to keywords and values. | |||
''VALUE1'' – Value to be entered in relation to the specific project. | |||
''VALUE2'' – Value to be entered in relation to the specific project. | |||
''VALUE3'' – Value to be entered in relation to the specific project. | |||
|- | |||
| RIV || ''LAY'' – Used to specify which row is being applied. | |||
''ROW'' – Used to specify which row is being applied. | |||
''COL'' – Used to specify which column is being applied. | |||
''STAGE'' – Variable that represents the head in the river. | |||
''COND'' – Variable that represents the riverbed hydraulic conductance. | |||
''RBOT'' – Variable that represents the elevation of the bottom of the riverbed. | |||
|- | |||
| SFR || ''RNO'' – A value that defines the reach number associated with the specified PERIOD data. | |||
''SFRSETTING'' – Information that is linked to keywords and values. | |||
''VALUE1'' – Value to be entered in relation to the specific project. | |||
''VALUE2'' – Value to be entered in relation to the specific project. | |||
|- | |||
| UZF || ''IUZNO'' – An integer value that defines the UZF cell number associated with the specified PERIOD data on the line. | |||
''FINF'' – A value that defines the applied infiltration rate of the UZF cell. | |||
''PET'' – A value that defines the ET rate of the UZF cell and specified GWF cell. | |||
''EXDP'' – A value that defines the ET extinction depth of the UZF cell. | |||
''EXTWC'' – A value that defines the amount of water removed from the UZF cell through evapotranspiration. | |||
''HA'' – A value that defines the amount of potential air that enters the UZF cell. | |||
''HROOT'' – A value that defines the root potential of the UZF cell. | |||
''ROOTACT'' – A value that defines how much root activity exists in the UZF cell. | |||
|- | |||
| WEL || ''LAY'' – Represents which layer within the grid to which the chosen well will be assigned. | |||
''ROW'' – Represents which row within the grid to which the chosen well will be assigned. | |||
''COL'' – Represents which column within the grid to which the chosen well will be assigned. | |||
''Q'' – Represents the volumetric well rate at which the recharge (positive value) and discharge (negative value) of the well will be. | |||
|} | |||
{{-}} | |||
==Date/Time Dialog== | ==Date/Time Dialog== | ||
[[File:GMS MODFLOW 6 - Date-Time dialog.png|thumb|250px|right|The ''Date/Time'' dialog]] | [[File:GMS MODFLOW 6 - Date-Time dialog.png|thumb|250px|right|The ''Date/Time'' dialog]] | ||
| Line 418: | Line 993: | ||
*The time is either manually entered in "HH:MM AM/PM" format, or selected using the [[File:Increment up and down arrows.png|9px]] '''Increment Up/Down''' buttons. | *The time is either manually entered in "HH:MM AM/PM" format, or selected using the [[File:Increment up and down arrows.png|9px]] '''Increment Up/Down''' buttons. | ||
{{-}} | {{-}} | ||
{{Auxiliary Variables Dialog}} | |||
{{ | {{MF6 Time Series Files Dialog}} | ||
{{MF6 Observation Files Dialog}} | |||
{{ | {{MF6 Time-Array Series Files Dialog}} | ||
{{MF6 Add Stresses Dialog}} | |||
{{-}} | |||
==External Link== | ==External Link== | ||
* [https://water.usgs.gov/ogw/modflow/MODFLOW.html#over MODFLOW 6 website with USGS] | * [https://water.usgs.gov/ogw/modflow/MODFLOW.html#over MODFLOW 6 website with USGS] | ||
* [https://water.usgs.gov/water-resources/software/MODFLOW-6/mf6io_6.1.0.pdf MODFLOW 6 Description of Input and Output] | |||
| Line 454: | Line 1,015: | ||
[[Category:MODFLOW]] | [[Category:MODFLOW]] | ||
[[Category:External Links]] | [[Category:External Links]] | ||
[[Category:Archived]] | |||
