WMS:GSSHA Multiple Simulations
Multiple GSSHA simulations using the same 2D grid can be managed within a single instance of WMS. The simulations are displayed in the Project Explorer, where it is possible to edit the job control, precipitation, GSSHA coverage, index maps, and continuous maps.
GSSHA Simulations
There are several different types of entries within a GSSHA simulation. Many of the options available under the GSSHA menu are also found in the right-click menu of the GSSHA project in the Project Explorer.
Note that:
- Selecting an item from the GSSHA menu performs the desired option on the active simulation.
- Selecting an item from the right-click menu performs the desired option on the corresponding simulation (this can be done even if the simulation is not active).
Below are common functions available through either of those methods.
Job Control
Selecting Job Control... from the GSSHA menu brings up the Job Control Parameters dialog for the active GSSHA simulation. This dialog can also be accessed by right-clicking on the "![]() Job Control" entry under a specific GSSHA simulation and selecting Edit....
Job Control" entry under a specific GSSHA simulation and selecting Edit....
Precipitation
Selecting Precipitation... from the GSSHA menu brings up the GSSHA Precipitation dialog for the active GSSHA simulation. This dialog can also be accessed by right-clicking on the "![]() Precipitation" entry under a specific GSSHA simulation and selecting Edit....
Precipitation" entry under a specific GSSHA simulation and selecting Edit....
GSSHA Coverage
When a GSSHA simulation is created, it is a assigned a GSSHA coverage (if a GSSHA coverage does not already exist, WMS creates one). To change the GSSHA coverage assigned to a specific simulation, right-click on "![]() GSSHA" underneath the desired GSSHA simulation and select Assign Coverage | [CoverageName] (where "[CoverageName]" is the name of the desired GSSHA coverage). Note that only coverages of the type "GSSHA" will be listed. The name of the coverage can be changed as desired as long as the type remains "GSSHA".
GSSHA" underneath the desired GSSHA simulation and select Assign Coverage | [CoverageName] (where "[CoverageName]" is the name of the desired GSSHA coverage). Note that only coverages of the type "GSSHA" will be listed. The name of the coverage can be changed as desired as long as the type remains "GSSHA".
Index Maps
All existing grid index and stream index maps are listed under the "![]() Index Maps" folder under the 2D grid in the Project Explorer. Index maps assigned to a specific GSSHA simulation are listed under the "
Index Maps" folder under the 2D grid in the Project Explorer. Index maps assigned to a specific GSSHA simulation are listed under the "![]() Index Maps" folder under each GSSHA simulation.
Index Maps" folder under each GSSHA simulation.
Right-clicking on "![]() Index Maps" gives the following options:
Index Maps" gives the following options:
- Import Scalar Dataset... – Brings up the 'Select File Format dialog.
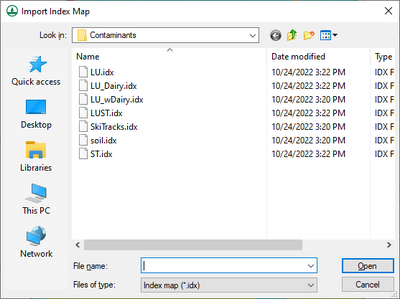
- Import Index Map... – Brings up the Import Index Map dialog.
To assign a map to a specific GSSHA simulation, right-click on the "![]() Index Maps" folder under the desired GSSHA simulation and select Assign | [DesiredIndexMap], where "[DesiredIndexMap]" is the name of the index map to be assigned. To immediately remove (or unassign) an index map from a specific GSSHA simulation, right-click on the index map and select Remove.
Index Maps" folder under the desired GSSHA simulation and select Assign | [DesiredIndexMap], where "[DesiredIndexMap]" is the name of the index map to be assigned. To immediately remove (or unassign) an index map from a specific GSSHA simulation, right-click on the index map and select Remove.
Right-clicking an index map under the "![]() Index Maps" folder gives several options:
Index Maps" folder gives several options:
- Rename – Allows the index map to be renamed.
- Export Dataset... – Opens a File Formats dialog.
- Export to KMZ... – Opens a Save dialog where a File name and save location can be specified for saving the GSSHA index map file as a Google Earth Vector (KMZ) file.
- Delete – Immediately deletes the selected index map.
- Properties... – Opens the Dataset Info dialog.
- View Values... – Opens the Edit Dataset Values dialog.
- Contour Options... – Opens the Contour Options dialog for the selected dataset.
Select File Format
The Select File Format dialog has the following options:
- GRASS ASCII grid file –
- Arc/Info ASCII grid file –
Select the desired format and click OK to close the Select File Format dialog and bring up an Open dialog where the desired file can be located and selected. Click Cancel to exit the dialog without making a selection.
Import Index Map
The Select File Format dialog is a custom Open dialog that allows for browsing to the location of an index map file (IDX file) and selecting it to be imported.
- Click Open once the desired file has been selected to import the index map into WMS.
- Click Cancel to exit the dialog without making a selection.
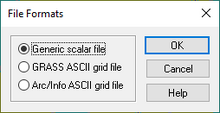
File Formats Dialog
The File Formats dialog gives the following options on the left side:
- Generic scalar file
- GRASS ASCII grid file
- Arc/Info ASCII grid file
There are three buttons on the right side of the dialog:
- OK – Saves the selection and opens a Save dialog where a File name and save location can be specified for saving the GSSHA index map file.
- Cancel – Discards any selection and closes the File Formats dialog without exporting the GSSHA index map file.
- Help – Opens the File Types page in a web browser.
Continuous Maps
All continuous maps (such as elevation) for all GSSHA simulations are shown in the Project Explorer under the 2D grid. To assign the maps to a specific GSSHA simulation, right-click on the "![]() Continuous Maps" folder under the desired GSSHA simulation, select Assign, and then select the index map that is to be assigned. To unassign a continuous map, right-click on the map and select Remove.
Continuous Maps" folder under the desired GSSHA simulation, select Assign, and then select the index map that is to be assigned. To unassign a continuous map, right-click on the map and select Remove.
Right-clicking continuous map under the 2D grid (not under the "![]() Continuous Maps" folder) gives several options:
Continuous Maps" folder) gives several options:
- Rename – Allows the index map to be renamed.
- Export Dataset... – Opens a File Formats dialog.
- Delete – Immediately deletes the selected index map.
- Properties... – Opens the Dataset Info dialog.
- View Values... – Opens the Edit Dataset Values dialog.
- Contour Options... – Opens the Contour Options dialog for the selected dataset.
- Set as Elevations... – Available for elevations datasets. Sets the elevations in the project according to the values in the selected dataset.
Solution
Once a GSSHA simulation has successfully run, the solution is shown underneath the simulation in the Project Explorer. If a solution already exists, it can be imported by right-clicking on the simulation's project name and selecting Read Solution to bring up the Read GSSHA Solution dialog.
GSSHA Groups
WMS allows for opening, running, and saving GSSHA groups. These are groups of two or more GSSHA simulations that are saved together so they can be opened or run at a later time. The following can be done with GSSHA groups:
- Opening a GSSHA Group
- There are two ways to open a GSSHA group:
- Running a GSSHA Group
- There are two ways to run a GSSHA group set of simulations. This can be done as long as there are multiple GSSHA simulations in the current project.
- Right-click on the "
 2D Grid Data" folder and select Run GSSHA Group... to bring up the Save and Run GSSHA Group dialog.
 - When in the 2D Grid
 module, select GSSHA | Run GSSHA Group... to bring up an Save and Run GSSHA Group dialog.
- Right-click on the "
- Saving GSSHA Groups
- There are two ways to save a GSSHA group set of simulations. This can be done as long as there are multiple GSSHA simulations in the current project.
- Right-click on the "
 2D Grid Data" folder and select Save GSSHA Group... to bring up the Save GSSHA Group dialog.
 - When in the 2D Grid
 module, select GSSHA | Save GSSHA Group... to bring up an Save GSSHA Group dialog.
- Right-click on the "
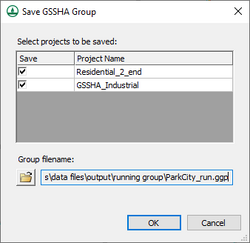
Save GSSHA Group
The "Save GSSHA Group" dialog appears in the following instances:
- When right-clicking on the "2D Grid Data" folder and selecting Save GSSHA Group..., or
- When selecting GSSHA | Save GSSHA Group... while in the 2D Grid module.
The Select projects to be saved section lists all of the GSSHA projects that are open in WMS. Check the box in the Save column to select the desired projects to save as a GSSHA group.
To set the Group filename that will be saved, click ![]() Browse to bring up a Save dialog where the location and File name of the GSSH group file (GGP) can be specified. Once saved, the filename and path will be displayed to the right of the
Browse to bring up a Save dialog where the location and File name of the GSSH group file (GGP) can be specified. Once saved, the filename and path will be displayed to the right of the ![]() Browse button.
Browse button.
At the bottom of the dialog are the following buttons:
- OK – Saves all changes, closes the "Save GSSHA Group" dialog, and saves the GSSHA group files as specified.
- Cancel – Discards any changes and closes the "Save GSSHA Group" dialog.
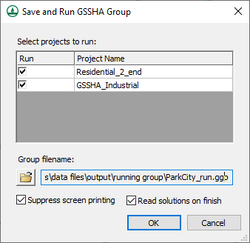
Save and Run GSSHA Group
The "Save and Run GSSHA Group" dialog appears in the following instances:
- When right-clicking on the "2D Grid Data" folder and selecting Run GSSHA Group..., or
- When selecting GSSHA | Run GSSHA Group... while in the 2D Grid module.
The Select projects to run section lists all of the GSSHA projects that are open in WMS. Check the box in the Run column to select the desired projects to save and run as a GSSHA group.
To set the Group filename that will be saved, click ![]() Browse to bring up a Save dialog where the location and File name of the GSSH group file (GGP) can be specified. Once saved, the filename and path will be displayed to the right of the
Browse to bring up a Save dialog where the location and File name of the GSSH group file (GGP) can be specified. Once saved, the filename and path will be displayed to the right of the ![]() Browse button.
Browse button.
There are two options:
- Suppress screen printing – Turning this on suppresses the output of runtime data from GSSHA at each time step, significantly reducing the overall run time required for a GSSHA simulation.
- Read solution on finish – Turn this on to automatically import the GSSHA solutions after each GSSHA run.
At the bottom of the dialog are the following buttons:
- OK – Saves all changes, closes the "Save and Run GSSHA Group" dialog, saves the GSSHA group files as specified, and begins the GSSHA runs on the selected simulations.
- Cancel – Discards any changes and closes the "Save and Run GSSHA Group" dialog.
GSSHA | |
|---|---|
| XMS Wiki Links | Calibration (Automated • Manual • Output) • Channel Routing • Contaminants • Digital Dams • Embankment Arcs • Feature Objects (Arcs • Nodes • Polygons) • File Types • Groundwater • Groups • Hydraulic Structures • Job Control • Join SSURGO Data • Mapping Tables • Maps • Menu • Model Linkage • Multiple Simulations • Nutrients • Observations • Output Control • Overland Soil Erosion • Pipe and Node Parameters • Precipitation • Radar Rainfall • Save GSSHA Project File • Smooth GSSHA Streams • Snowmelt • Solution (Analysis • Data) |
| Related Tools | MWBM Wizard • Using Soil Type Data with GSSHA |
| GSSHA Wiki External Links | GSSHA Wiki: Overview • Primer • User's Manual • Tutorials |
WMS – Watershed Modeling System | ||
|---|---|---|
| Modules: | Terrain Data • Drainage • Map • Hydrologic Modeling • River • GIS • 2D Grid • 2D Scatter |  |
| Models: | CE-QUAL-W2 • GSSHA • HEC-1 • HEC-HMS • HEC-RAS • HSPF • MODRAT • NSS • OC Hydrograph • OC Rational • Rational • River Tools • Storm Drain • SMPDBK • SWMM • TR-20 • TR-55 | |
| Toolbars: | Modules • Macros • Units • Digitize • Static Tools • Dynamic Tools • Drawing • Get Data Tools | |
| Aquaveo | ||


